Epson Ensemble HD 8100 Installation Guide - Page 22
Epson Ensemble HD 8100 - Home Cinema System Manual
 |
View all Epson Ensemble HD 8100 manuals
Add to My Manuals
Save this manual to your list of manuals |
Page 22 highlights
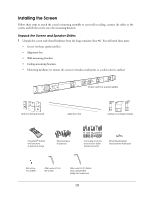
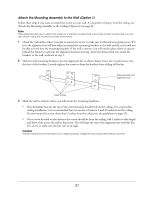
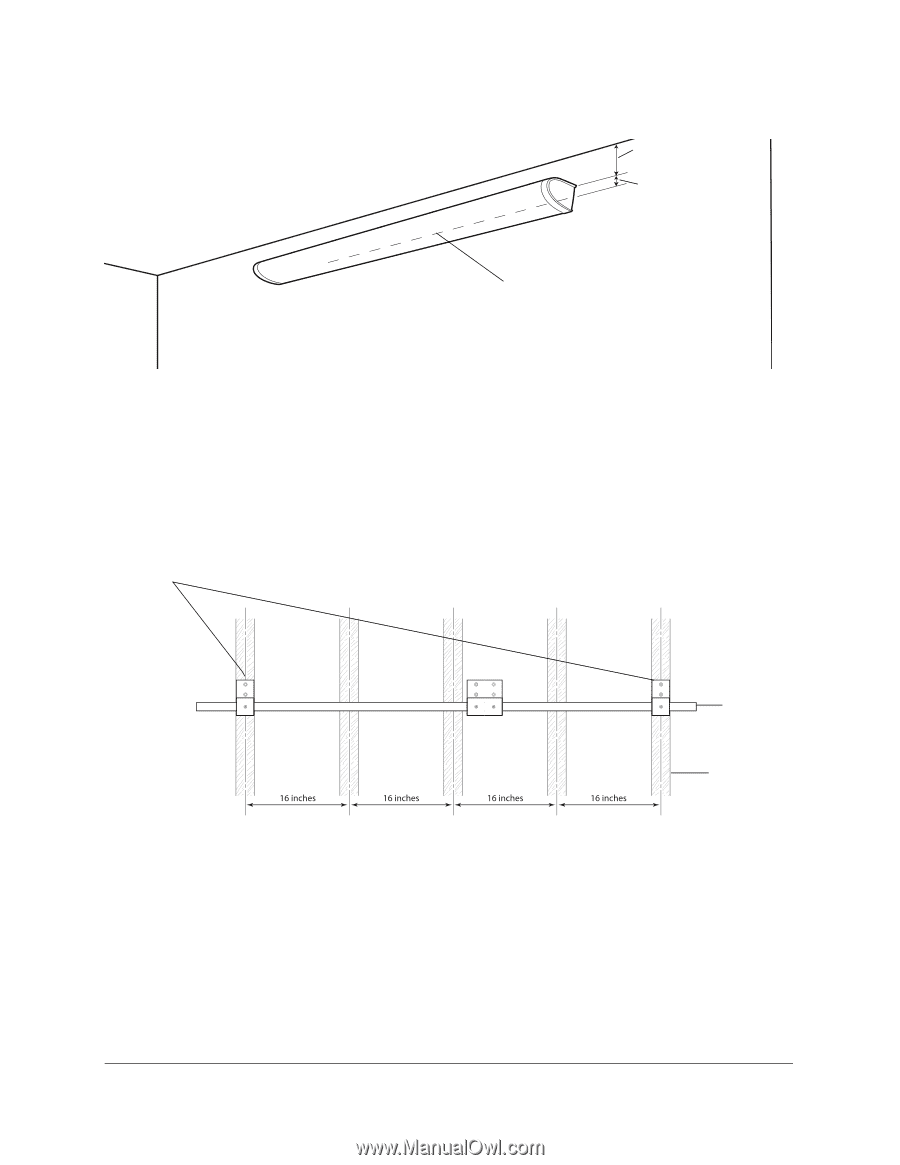
Mark the wall as shown below: Distance from ceiling... ...plus 3 inches Do not install alignment bar (not shown) above this line 4 Hold the mounting assembly against the wall and use a stud finder to locate two studs, one near each end of the alignment bar. Studs are normally spaced 16 inches on center. Mark the exact center of each stud. Warning You must find the exact center of each stud, or you won't be able to attach the screen securely. Note The middle bracket doesn't have to be attached to a stud. It must, however, be aligned with the middle of the screen. See step 9. Locate studs where you can attach the end brackets Alignment bar Stud 22
-
 1
1 -
2
-
3
-
4
-
5
-
6
-
7
-
8
-
9
-
10
-
11
-
12
-
13
-
14
-
15
-
16
-
 17
17 -
 18
18 -
 19
19 -
 20
20 -
 21
21 -
 22
22 -
 23
23 -
 24
24 -
 25
25 -
 26
26 -
 27
27 -
28
-
29
-
30
-
31
-
32
-
33
-
34
-
35
-
36
-
37
-
38
-
39
-
40
-
41
-
42
-
43
-
44
-
45
-
46
-
47
-
48
-
49
-
50
-
51
-
52
-
53
-
54
-
55
-
56
-
57
-
58
-
59
-
60
-
61
-
62
-
63
-
64
-
65
-
66
-
67
-
68
-
69
-
70
-
71
 |
 |
22
Mark the wall as shown below:
4
Hold the mounting assembly against the wall and use a stud finder to locate two studs, one near each end
of the alignment bar. Studs are normally spaced 16 inches on center. Mark the exact center of each stud.
Warning
You must find the exact center of each stud, or you won’t be able to attach the screen securely.
Note
The middle bracket doesn’t have to be attached to a stud. It must, however, be aligned with the middle of the
screen. See step 9.
Distance from ceiling...
...plus 3 inches
Do not install alignment bar (not shown)
above this line
Locate studs where you can
attach the end brackets
Stud
Alignment
bar