Epson G6870 User Manual - Page 160
Top Edge, Bottom Edge, Right Edge, Left Edge, Black Level, Color Adjustment, Enter
 |
View all Epson G6870 manuals
Add to My Manuals
Save this manual to your list of manuals |
Page 160 highlights
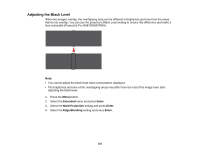
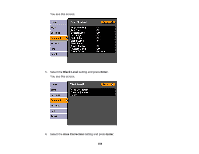
8. Use the arrow buttons to move the point to the edge of the blending area. 9. To move another point, press the Esc button and repeat the previous two steps. 10. When you are finished, press the Esc button twice and select Yes when you see the confirmation message to return to the Black Level menu screen. Note: Changing any of the Top Edge, Bottom Edge, Right Edge, or Left Edge settings resets the Black Level setting to its default value. 11. Select the Color Adjustment setting and press Enter. You see this screen: 12. Adjust the brightness and tone of the areas that do not overlap to match the areas that overlap using the displayed adjustment sliders. 160
-
 1
1 -
2
-
3
-
4
-
5
-
6
-
7
-
8
-
9
-
10
-
11
-
12
-
13
-
14
-
15
-
16
-
17
-
18
-
19
-
20
-
21
-
22
-
23
-
24
-
25
-
26
-
27
-
28
-
29
-
30
-
31
-
32
-
33
-
34
-
35
-
36
-
37
-
38
-
39
-
40
-
41
-
42
-
43
-
44
-
45
-
46
-
47
-
48
-
49
-
50
-
51
-
52
-
53
-
54
-
55
-
56
-
57
-
58
-
59
-
60
-
61
-
62
-
63
-
64
-
65
-
66
-
67
-
68
-
69
-
70
-
71
-
72
-
73
-
74
-
75
-
76
-
77
-
78
-
79
-
80
-
81
-
82
-
83
-
84
-
85
-
86
-
87
-
88
-
89
-
90
-
91
-
92
-
93
-
94
-
95
-
96
-
97
-
98
-
99
-
100
-
101
-
102
-
103
-
104
-
105
-
106
-
107
-
108
-
109
-
110
-
111
-
112
-
113
-
114
-
115
-
116
-
117
-
118
-
119
-
120
-
121
-
122
-
123
-
124
-
125
-
126
-
127
-
128
-
129
-
130
-
131
-
132
-
133
-
134
-
135
-
136
-
137
-
138
-
139
-
140
-
141
-
142
-
143
-
144
-
145
-
146
-
147
-
148
-
149
-
150
-
151
-
152
-
153
-
154
-
 155
155 -
 156
156 -
 157
157 -
 158
158 -
 159
159 -
 160
160 -
 161
161 -
 162
162 -
 163
163 -
 164
164 -
 165
165 -
166
-
167
-
168
-
169
-
170
-
171
-
172
-
173
-
174
-
175
-
176
-
177
-
178
-
179
-
180
-
181
-
182
-
183
-
184
-
185
-
186
-
187
-
188
-
189
-
190
-
191
-
192
-
193
-
194
-
195
-
196
-
197
-
198
-
199
-
200
-
201
-
202
-
203
-
204
-
205
-
206
-
207
-
208
-
209
-
210
-
211
-
212
-
213
-
214
-
215
-
216
-
217
-
218
-
219
-
220
-
221
-
222
-
223
-
224
-
225
-
226
-
227
-
228
-
229
-
230
-
231
-
232
-
233
-
234
-
235
-
236
-
237
-
238
-
239
-
240
-
241
-
242
-
243
-
244
-
245
-
246
-
247
-
248
-
249
-
250
-
251
-
252
-
253
-
254
-
255
-
256
-
257
-
258
-
259
-
260
-
261
-
262
-
263
-
264
-
265
-
266
-
267
-
268
-
269
-
270
-
271
-
272
-
273
-
274
-
275
-
276
-
277
-
278
-
279
-
280
-
281
-
282
-
283
-
284
-
285
-
286
-
287
-
288
-
289
-
290
-
291
-
292
-
293
-
294
 |
 |

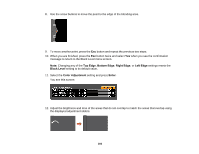
8.
Use the arrow buttons to move the point to the edge of the blending area.
9.
To move another point, press the
Esc
button and repeat the previous two steps.
10. When you are finished, press the
Esc
button twice and select
Yes
when you see the confirmation
message to return to the Black Level menu screen.
Note:
Changing any of the
Top Edge
,
Bottom Edge
,
Right Edge
, or
Left Edge
settings resets the
Black Level
setting to its default value.
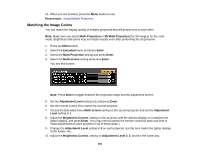
11. Select the
Color Adjustment
setting and press
Enter
.
You see this screen:
12. Adjust the brightness and tone of the areas that do not overlap to match the areas that overlap using
the displayed adjustment sliders.
160