Epson LW-700 Quick Start and Warranty - Page 33
Creating labels using Mac OS X, Border, Symbol, Print, Printer Settings
 |
View all Epson LW-700 manuals
Add to My Manuals
Save this manual to your list of manuals |
Page 33 highlights
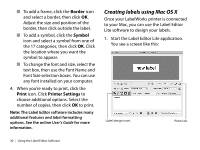
■ To add a frame, click the Border icon and select a border, then click OK. Adjust the size and position of the border, then click outside the label. ■ To add a symbol, click the Symbol icon and select a symbol from one of the 17 categories, then click OK. Click the location where you want the symbol to appear. ■ To change the font and size, select the text box, then use the Font Name and Font Size selection boxes. You can use any font installed on your computer. 4. When you're ready to print, click the Print icon. Click Printer Settings to choose additional options. Select the number of copies, then click OK to print. Note: The Label Editor software includes many additional features and label formatting options. See the online User's Guide for more information. Creating labels using Mac OS X Once your LabelWorks printer is connected to your Mac, you can use the Label Editor Lite software to design your labels. 1. Start the Label Editor Lite application. You see a screen like this: Label design icons Print icon 30 | Using the Label Editor Software
-
 1
1 -
2
-
3
-
4
-
5
-
6
-
7
-
8
-
9
-
10
-
11
-
12
-
13
-
14
-
15
-
16
-
17
-
18
-
19
-
20
-
21
-
22
-
23
-
24
-
25
-
26
-
27
-
 28
28 -
 29
29 -
 30
30 -
 31
31 -
 32
32 -
 33
33 -
 34
34 -
 35
35 -
 36
36 -
 37
37 -
 38
38 -
39
-
40
-
41
-
42
-
43
-
44
-
45
-
46
-
47
-
48
-
49
-
50
-
51
-
52
-
53
-
54
-
55
-
56
-
57
-
58
-
59
-
60
-
61
-
62
-
63
-
64
-
65
-
66
-
67
-
68
-
69
-
70
-
71
-
72
-
73
-
74
-
75
-
76
-
77
-
78
-
79
-
80
-
81
-
82
-
83
-
84
-
85
-
86
-
87
-
88
 |
 |
