Epson PP-100II Users Guide - Page 122
Incorrect or Missing Colors, Blurry or Smeared Printout, See Replacing an Ink Cartridge
 |
View all Epson PP-100II manuals
Add to My Manuals
Save this manual to your list of manuals |
Page 122 highlights
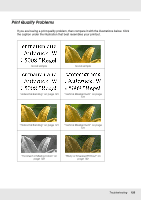
Incorrect or Missing Colors ❏ Adjust the color settings in your application or in your printer driver settings. Check the Main window. See the printer driver online Help for details. ❏ Run the head cleaning utility. & See "Cleaning the Print Head" on page 96. ❏ Check the H Ink light. If the light is on, replace the appropriate ink cartridge. & See "Replacing an Ink Cartridge" on page 91. ❏ If you have just replaced an ink cartridge, make sure the date on the box has not expired. If you have not used the product for a long time, replace the ink cartridges. & See "Replacing an Ink Cartridge" on page 91. Blurry or Smeared Printout ❏ Use genuine Epson ink cartridges. ❏ Make sure the product is on a flat, stable surface that extends beyond the base in all directions. The product will not operate properly if it is tilted. ❏ Make sure your disc is not damaged, dirty, or too old. ❏ Make sure your disc is dry and the printable side is facing up. ❏ Make sure the label type selected in the printer driver is appropriate for the type of disc loaded in the product. & See "Publishing Discs" on page 25. ❏ Do not touch or allow anything to come into contact with the printed side of a disc with a shiny finish. After printing on a glossy disc, allow the ink to set for a few hours before handling it. ❏ Run the head cleaning utility. & See "Cleaning the Print Head" on page 96. Troubleshooting 122
-
 1
1 -
2
-
3
-
4
-
5
-
6
-
7
-
8
-
9
-
10
-
11
-
12
-
13
-
14
-
15
-
16
-
17
-
18
-
19
-
20
-
21
-
22
-
23
-
24
-
25
-
26
-
27
-
28
-
29
-
30
-
31
-
32
-
33
-
34
-
35
-
36
-
37
-
38
-
39
-
40
-
41
-
42
-
43
-
44
-
45
-
46
-
47
-
48
-
49
-
50
-
51
-
52
-
53
-
54
-
55
-
56
-
57
-
58
-
59
-
60
-
61
-
62
-
63
-
64
-
65
-
66
-
67
-
68
-
69
-
70
-
71
-
72
-
73
-
74
-
75
-
76
-
77
-
78
-
79
-
80
-
81
-
82
-
83
-
84
-
85
-
86
-
87
-
88
-
89
-
90
-
91
-
92
-
93
-
94
-
95
-
96
-
97
-
98
-
99
-
100
-
101
-
102
-
103
-
104
-
105
-
106
-
107
-
108
-
109
-
110
-
111
-
112
-
113
-
114
-
115
-
116
-
 117
117 -
 118
118 -
 119
119 -
 120
120 -
 121
121 -
 122
122 -
 123
123 -
 124
124 -
 125
125 -
 126
126 -
 127
127 -
128
-
129
-
130
-
131
-
132
-
133
-
134
-
135
-
136
-
137
-
138
-
139
-
140
-
141
-
142
-
143
-
144
 |
 |
