Epson Personal Document Station User Setup Information - PC - Page 12
Getting Started, Then read the Xerox Desktop Document Management Suite
 |
View all Epson Personal Document Station manuals
Add to My Manuals
Save this manual to your list of manuals |
Page 12 highlights
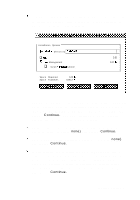
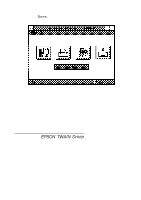
10. If you selected not to install the File Management or Personal Cabinet components in step 6, skip to step 11. Otherwise, you see the Visual Recall Setup screen. Accept the default directory in which to install the program files or delete it and enter a new directory. Then choose OK. 11. The program begins copying files to your hard disk drive and prompts you to insert the rest of the diskettes. Follow the instructions on the screen. 12. After all the files are copied, you see a dialog box where you must enter your name, company (optional), and the serial number of the DDMS program. The serial number is usually printed inside the manual or on the registration card. Enter this information and choose Continue. 13. The program creates a Windows program group and icons. Then you see the Exit Setup screen; choose OK. 14. The program starts the Windows Write program and displays the Release Notes file. Read this file for the latest information about your software, and print it if you like. 15. Open the File menu and select Exit to exit Write. 16. Remove the last installation diskette from the diskette drive. 17. Exit Windows. The installation program placed the Xerox DDMS Control Panel and Paper Sensor icons in your Windows Startup group and created a Xerox Applications group. See the instructions in the next section to scan a test document. Then read the Xerox Desktop Document Management Suite manuals, quick reference guides, and on-line help utilities for instructions on using the programs to process your scanned documents. 10 Getting Started
-
 1
1 -
2
-
3
-
4
-
5
-
6
-
 7
7 -
 8
8 -
 9
9 -
 10
10 -
 11
11 -
 12
12 -
 13
13 -
 14
14 -
 15
15 -
 16
16 -
 17
17 -
18
 |
 |