Epson PowerLite 85 User's Guide - Page 27
Using Keystone Correction, From the Settings menu, select
 |
View all Epson PowerLite 85 manuals
Add to My Manuals
Save this manual to your list of manuals |
Page 27 highlights
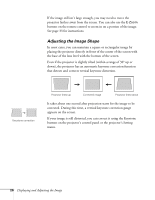
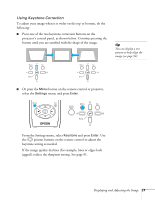
Using Keystone Correction To adjust your image when it is wider on the top or bottom, do the following: ■ Press one of the two keystone correction buttons on the projector's control panel, as shown below. Continue pressing the button until you are satisfied with the shape of the image. tip You can display a test pattern to help align the image (see page 94). ■ Or press the Menu button on the remote control or projector, select the Settings menu, and press Enter. From the Settings menu, select Keystone and press Enter. Use the pointer buttons on the remote control to adjust the keystone setting as needed. If the image quality declines (for example, lines or edges look jagged), reduce the sharpness setting. See page 91. Displaying and Adjusting the Image 27
-
 1
1 -
2
-
3
-
4
-
5
-
6
-
7
-
8
-
9
-
10
-
11
-
12
-
13
-
14
-
15
-
16
-
17
-
18
-
19
-
20
-
21
-
 22
22 -
 23
23 -
 24
24 -
 25
25 -
 26
26 -
 27
27 -
 28
28 -
 29
29 -
 30
30 -
 31
31 -
 32
32 -
33
-
34
-
35
-
36
-
37
-
38
-
39
-
40
-
41
-
42
-
43
-
44
-
45
-
46
-
47
-
48
-
49
-
50
-
51
-
52
-
53
-
54
-
55
-
56
-
57
-
58
-
59
-
60
-
61
-
62
-
63
-
64
-
65
-
66
-
67
-
68
-
69
-
70
-
71
-
72
-
73
-
74
-
75
-
76
-
77
-
78
-
79
-
80
-
81
-
82
-
83
-
84
-
85
-
86
-
87
-
88
-
89
-
90
-
91
-
92
-
93
-
94
-
95
-
96
-
97
-
98
-
99
-
100
-
101
-
102
-
103
-
104
-
105
-
106
-
107
-
108
-
109
-
110
-
111
-
112
-
113
-
114
-
115
-
116
-
117
-
118
-
119
-
120
-
121
-
122
-
123
-
124
-
125
-
126
-
127
-
128
-
129
-
130
-
131
-
132
-
133
-
134
-
135
-
136
-
137
-
138
-
139
-
140
-
141
-
142
-
143
-
144
-
145
-
146
-
147
-
148
-
149
-
150
-
151
-
152
-
153
-
154
-
155
-
156
-
157
-
158
-
159
-
160
-
161
-
162
-
163
-
164
-
165
-
166
-
167
-
168
-
169
-
170
-
171
-
172
-
173
-
174
-
175
 |
 |
