Epson PowerLite 85 User's Guide - Page 46
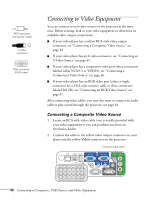
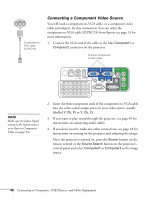
Connecting a Component Video Source
 |
View all Epson PowerLite 85 manuals
Add to My Manuals
Save this manual to your list of manuals |
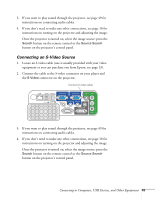
Page 46 highlights
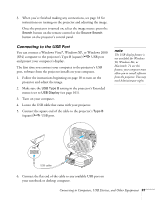
Component-toVGA cable (ELPKC19) Connecting a Component Video Source You will need a component-to-VGA cable, or a component video cable and adapter, for this connection. You can order the component-to-VGA cable (ELPKC19) from Epson; see page 13 for more information. 1. Connect the VGA-end of the cable to the blue Computer1 or Computer2 connector on the projector. Connect componentto-VGA cable note Make sure the Input Signal setting in the Signal menu is set to Auto or Component Video (see page 93). 2. Insert the three component ends of the component-to-VGA cable into the color-coded output ports on your video source, usually labelled Y, Pb, Pr or Y, Cb, Cr. 3. If you want to play sound through the projector, see page 49 for instructions on connecting audio cables. 4. If you don't need to make any other connections, see page 18 for instructions on turning on the projector and adjusting the image. Once the projector is turned on, press the Search button on the remote control or the Source Search button on the projector's control panel and select Computer1 or Computer2 as the image source. 46 Connecting to Computers, USB Devices, and Other Equipment
-
 1
1 -
2
-
3
-
4
-
5
-
6
-
7
-
8
-
9
-
10
-
11
-
12
-
13
-
14
-
15
-
16
-
17
-
18
-
19
-
20
-
21
-
22
-
23
-
24
-
25
-
26
-
27
-
28
-
29
-
30
-
31
-
32
-
33
-
34
-
35
-
36
-
37
-
38
-
39
-
40
-
 41
41 -
 42
42 -
 43
43 -
 44
44 -
 45
45 -
 46
46 -
 47
47 -
 48
48 -
 49
49 -
 50
50 -
 51
51 -
52
-
53
-
54
-
55
-
56
-
57
-
58
-
59
-
60
-
61
-
62
-
63
-
64
-
65
-
66
-
67
-
68
-
69
-
70
-
71
-
72
-
73
-
74
-
75
-
76
-
77
-
78
-
79
-
80
-
81
-
82
-
83
-
84
-
85
-
86
-
87
-
88
-
89
-
90
-
91
-
92
-
93
-
94
-
95
-
96
-
97
-
98
-
99
-
100
-
101
-
102
-
103
-
104
-
105
-
106
-
107
-
108
-
109
-
110
-
111
-
112
-
113
-
114
-
115
-
116
-
117
-
118
-
119
-
120
-
121
-
122
-
123
-
124
-
125
-
126
-
127
-
128
-
129
-
130
-
131
-
132
-
133
-
134
-
135
-
136
-
137
-
138
-
139
-
140
-
141
-
142
-
143
-
144
-
145
-
146
-
147
-
148
-
149
-
150
-
151
-
152
-
153
-
154
-
155
-
156
-
157
-
158
-
159
-
160
-
161
-
162
-
163
-
164
-
165
-
166
-
167
-
168
-
169
-
170
-
171
-
172
-
173
-
174
-
175
 |
 |
