Epson Stylus COLOR 900G User Manual - Page 41
Advanced, Automatic, Photo-realistic, Vivid, No Color Adjustment, Advanced Printing,
 |
View all Epson Stylus COLOR 900G manuals
Add to My Manuals
Save this manual to your list of manuals |
Page 41 highlights
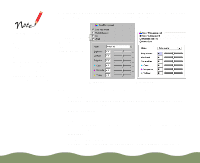
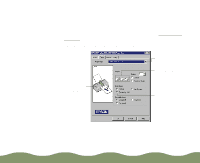
4 Click the Advanced button (More Settings in Windows 3.1). The Color Management section of the Advanced dialog box appears as shown: Click the Color Adjustment button if you don't see this view. The appearance of the Color section of the More Settings dialog box always appears as shown here on Windows 3.1. Not available with Windows 3.1; ICM not available with Windows NT Windows Macintosh 5 Choose one of the following Color Adjustment Modes: Automatic Analyzes the color information in your project and optimizes color correction accordingly. Photo-realistic For printing color photographs. Vivid For printing graphics-intensive documents like presentations with charts and graphs. Intensifies colors and lightens the midtones and highlights. No Color Adjustment Disables the color adjustment features of the printer software so you can use a stand-alone color management utility. Advanced Printing Page 40
-
 1
1 -
2
-
3
-
4
-
5
-
6
-
7
-
8
-
9
-
10
-
11
-
12
-
13
-
14
-
15
-
16
-
17
-
18
-
19
-
20
-
21
-
22
-
23
-
24
-
25
-
26
-
27
-
28
-
29
-
30
-
31
-
32
-
33
-
34
-
35
-
 36
36 -
 37
37 -
 38
38 -
 39
39 -
 40
40 -
 41
41 -
 42
42 -
 43
43 -
 44
44 -
 45
45 -
 46
46 -
47
-
48
-
49
-
50
-
51
-
52
-
53
-
54
-
55
-
56
-
57
-
58
-
59
-
60
-
61
-
62
-
63
-
64
-
65
-
66
-
67
-
68
-
69
-
70
-
71
-
72
-
73
-
74
-
75
-
76
-
77
-
78
-
79
-
80
-
81
-
82
-
83
-
84
-
85
-
86
-
87
-
88
-
89
-
90
-
91
-
92
-
93
-
94
-
95
-
96
-
97
-
98
-
99
-
100
-
101
-
102
-
103
-
104
-
105
-
106
-
107
-
108
-
109
-
110
-
111
-
112
-
113
-
114
-
115
-
116
-
117
-
118
-
119
-
120
-
121
-
122
-
123
-
124
-
125
-
126
-
127
-
128
-
129
-
130
-
131
-
132
-
133
-
134
-
135
-
136
-
137
-
138
-
139
-
140
-
141
-
142
-
143
-
144
-
145
-
146
-
147
-
148
-
149
-
150
-
151
-
152
-
153
-
154
-
155
-
156
-
157
-
158
-
159
-
160
-
161
-
162
-
163
-
164
-
165
-
166
-
167
-
168
-
169
-
170
-
171
-
172
-
173
-
174
-
175
-
176
-
177
-
178
-
179
-
180
-
181
-
182
-
183
-
184
-
185
-
186
-
187
-
188
-
189
-
190
-
191
-
192
-
193
-
194
-
195
-
196
-
197
-
198
-
199
-
200
-
201
-
202
-
203
-
204
-
205
-
206
 |
 |