Epson Stylus Pro 4800 Portrait Edition Product Information Guide - Page 12
Changing the Black Ink Cartridge, Draining the Old Ink
 |
View all Epson Stylus Pro 4800 Portrait Edition manuals
Add to My Manuals
Save this manual to your list of manuals |
Page 12 highlights
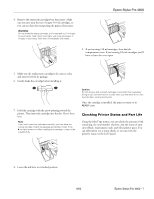
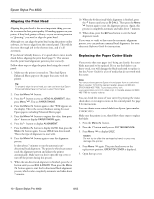
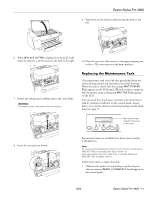
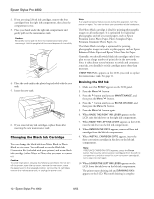
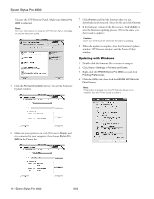
Epson Stylus Pro 4800 2. If you are using 220 ml ink cartridges, remove the four cartridges from the right ink compartment, then close the compartment cover. 3. Place your hand under the right ink compartment and gently pull out the maintenance tank. Caution: Be careful not to spill ink from the maintenance tank when removing it. Hold it upright at all times and dispose of it carefully. 4. Place the used tank in the plastic bag included with the new tank. 5. Insert the new tank. 6. If you removed any ink cartridges, replace them after inserting the new maintenance tank. Changing the Black Ink Cartridge You can change the black ink from Matte Black to Photo Black or vice-versa. You will need to use the Black Ink Conversion Kit (included with your printer) and a new black ink cartridge (either Matte or Photo that you want to convert to). Caution: To avoid interruption, observe the following conditions: Do not turn off the printer, open the top cover, remove the rear cover, move the paper lever to the released position, remove the ink cartridges, remove the maintenance tank, or unplug the power cord. Note: If an electrical power failure occurs during this operation, turn the printer on again. You can continue your procedure at the breakpoint. The Photo Black cartridge is ideal for printing photographic images on all media types. It is optimized for traditional photographic and ink jet-coated papers, such as Epson Premium Luster Photo Paper, Photo Semigloss Paper, Premium Semimatte Photo Paper, etc. The Matte Black cartridge is optimized for printing photographic images on matte or plain papers, such as Epson Enhanced Matte Paper and Epson Velvet Fine Art Paper. Generally, you should switch black ink cartridges only if you plan to run a large number of print jobs in the new mode. Since it takes about several minutes to switch and consumes some ink, you shouldn't switch cartridges more often than necessary. If MNT TNK FULL appears on the LCD, you need to replace the maintenance tank. See page 11. Draining the Old Ink 1. Make sure that READY appears on the LCD panel. 2. Press the Menu button. 3. Press the button until you see MAINTENANCE, and then press the Menu button. 4. Press the button until you see BK INK CHANGE, and then press the Menu button. 5. Press the Menu button again. 6. When RAISE THE RIGHT INK LEVER appears on the LCD, raise the ink lever on the right ink compartment. 7. When RAISE THE LEFT INK LEVER appears on the LCD, raise the ink lever on the left ink compartment. 8. When REMOVE INK CRTG appears, remove all four ink cartridges from the left ink compartment. 9. When INSTALL CNVRSION CRTG appears, insert the three conversion cartridges in the slots on the left ink compartment. Note: If REPLACE CNVRSION CRTG appears, press the Pause button. Remove the old conversion cartridge(s) from the left ink compartment, and then insert the new conversion cartridge(s). Go to step 4 to start again. 10. When LOWER THE LEFT INK LEVER appears on the LCD, lower the ink lever on the left ink compartment. The printer starts draining ink and DRAINING XX% appears on the LCD. Wait until draining is complete. 12 - Epson Stylus Pro 4800 8/05
-
 1
1 -
2
-
3
-
4
-
5
-
6
-
 7
7 -
 8
8 -
 9
9 -
 10
10 -
 11
11 -
 12
12 -
 13
13 -
 14
14 -
 15
15 -
 16
16
 |
 |
