Epson SureColor P800 User Manual - Page 80
Paper Configuration Options - Windows, Advanced B&W Photo Options - Windows
 |
View all Epson SureColor P800 manuals
Add to My Manuals
Save this manual to your list of manuals |
Page 80 highlights
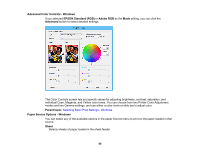
6. When using plain paper, select an Ink option: • To print using the previous print job's setting, select Last-Used. • Select the Photo Black Ink or Matte Black Ink setting according to the media type you are using. Note: To avoid changing black ink more often than necessary, you can set the default black ink type to the one you usually use. See the link at the end of these steps. 7. Select a Color option: • To print a color document or photo, select the Color setting. • To print text and graphics in black or shades of gray, select the Advanced B&W Photo or Grayscale setting. Note: The Grayscale setting is only available when plain paper is selected as the Media Type. 8. For the Print Quality setting, select Speed, Quality, or Max Quality (available with certain media types only), or select Quality Options and choose the quality option that matches the print quality you want to use. 9. Select the desired color management option as the Mode setting. 10. Select the Source setting that matches the paper feeding method you are using. 11. Select the size of the paper you loaded as the Size setting. Note: You can also select the User-Defined setting to create a custom paper size. 12. If you want to print a photo without borders, select Borderless. Note: You must select a compatible borderless paper type and size to print without borders. Check the borderless paper compatibility list for details. 13. To see a preview of how your document or photo will print, select Print Preview. (The preview appears after you click Print but before printing starts.) 14. To layout multiple print jobs for printing all at once, select Layout Manager. Paper Configuration Options - Windows Advanced B&W Photo Options - Windows Print Quality Options - Windows Color Management Options - Windows 80
-
 1
1 -
2
-
3
-
4
-
5
-
6
-
7
-
8
-
9
-
10
-
11
-
12
-
13
-
14
-
15
-
16
-
17
-
18
-
19
-
20
-
21
-
22
-
23
-
24
-
25
-
26
-
27
-
28
-
29
-
30
-
31
-
32
-
33
-
34
-
35
-
36
-
37
-
38
-
39
-
40
-
41
-
42
-
43
-
44
-
45
-
46
-
47
-
48
-
49
-
50
-
51
-
52
-
53
-
54
-
55
-
56
-
57
-
58
-
59
-
60
-
61
-
62
-
63
-
64
-
65
-
66
-
67
-
68
-
69
-
70
-
71
-
72
-
73
-
74
-
 75
75 -
 76
76 -
 77
77 -
 78
78 -
 79
79 -
 80
80 -
 81
81 -
 82
82 -
 83
83 -
 84
84 -
 85
85 -
86
-
87
-
88
-
89
-
90
-
91
-
92
-
93
-
94
-
95
-
96
-
97
-
98
-
99
-
100
-
101
-
102
-
103
-
104
-
105
-
106
-
107
-
108
-
109
-
110
-
111
-
112
-
113
-
114
-
115
-
116
-
117
-
118
-
119
-
120
-
121
-
122
-
123
-
124
-
125
-
126
-
127
-
128
-
129
-
130
-
131
-
132
-
133
-
134
-
135
-
136
-
137
-
138
-
139
-
140
-
141
-
142
-
143
-
144
-
145
-
146
-
147
-
148
-
149
-
150
-
151
-
152
-
153
-
154
-
155
-
156
-
157
-
158
-
159
-
160
-
161
-
162
-
163
-
164
-
165
-
166
-
167
-
168
-
169
-
170
-
171
-
172
-
173
-
174
-
175
-
176
-
177
-
178
-
179
-
180
-
181
-
182
-
183
-
184
-
185
-
186
-
187
-
188
-
189
-
190
-
191
-
192
-
193
-
194
-
195
-
196
-
197
-
198
-
199
-
200
-
201
-
202
-
203
-
204
-
205
-
206
-
207
-
208
-
209
 |
 |
