Epson SureColor P800 User Manual - Page 82
Advanced B&W Photo Options - Windows, Drying Time per Print Head Pass
 |
View all Epson SureColor P800 manuals
Add to My Manuals
Save this manual to your list of manuals |
Page 82 highlights
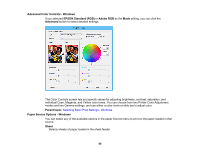
Drying Time per Print Head Pass Pauses print head movement for up to 5 seconds after each pass to allow ink to dry. This lets you print with non-Epson media and avoid smearing the ink. Paper Feed Adjustment Modifies the speed of the paper feeding to compensate for banding in the direction of the print head. Paper Thickness Lets you select the thickness of your paper or media. Platen Gap Adjusts the distance from the paper to the print head. (Use a wider setting if you are seeing edge marks or scuffs on your prints.) Parent topic: Selecting Basic Print Settings - Windows Advanced B&W Photo Options - Windows If you select Advanced B&W Photo as the Color option, you can easily produce neutral and toned black-and-white prints. Whether your photo is color or grayscale, you can use this screening and color management technology to create stunning black-and-white prints. You can select any of the available options. Color Toning Adds tone (hue) to your black-and-white output. The default is Neutral, which provides a neutral tonal scale print. You can also choose other popular presets such as Cool, Warm, and Sepia. Note that the presets affect the target found in the tone color circle. Tone Changes the entire tonal scale of your black-and-white output. While Darker is the default setting, you may see better results if you choose Dark. The tone color circle adjusts the hue of your black-andwhite print. Click on any portion of the color wheel or enter corresponding values to customize the tone (hue) to add to your print. The closer you select to the edge of the wheel, the more color you add. Brightness Adjusts the overall lightness and darkness of your image. Contrast Adjusts the difference between the light and dark areas of your image. Shadow Tonality Controls tonality only in the shadow areas of your image. Highlight Tonality Controls tonality only in the highlight areas of your image. 82
-
 1
1 -
2
-
3
-
4
-
5
-
6
-
7
-
8
-
9
-
10
-
11
-
12
-
13
-
14
-
15
-
16
-
17
-
18
-
19
-
20
-
21
-
22
-
23
-
24
-
25
-
26
-
27
-
28
-
29
-
30
-
31
-
32
-
33
-
34
-
35
-
36
-
37
-
38
-
39
-
40
-
41
-
42
-
43
-
44
-
45
-
46
-
47
-
48
-
49
-
50
-
51
-
52
-
53
-
54
-
55
-
56
-
57
-
58
-
59
-
60
-
61
-
62
-
63
-
64
-
65
-
66
-
67
-
68
-
69
-
70
-
71
-
72
-
73
-
74
-
75
-
76
-
 77
77 -
 78
78 -
 79
79 -
 80
80 -
 81
81 -
 82
82 -
 83
83 -
 84
84 -
 85
85 -
 86
86 -
 87
87 -
88
-
89
-
90
-
91
-
92
-
93
-
94
-
95
-
96
-
97
-
98
-
99
-
100
-
101
-
102
-
103
-
104
-
105
-
106
-
107
-
108
-
109
-
110
-
111
-
112
-
113
-
114
-
115
-
116
-
117
-
118
-
119
-
120
-
121
-
122
-
123
-
124
-
125
-
126
-
127
-
128
-
129
-
130
-
131
-
132
-
133
-
134
-
135
-
136
-
137
-
138
-
139
-
140
-
141
-
142
-
143
-
144
-
145
-
146
-
147
-
148
-
149
-
150
-
151
-
152
-
153
-
154
-
155
-
156
-
157
-
158
-
159
-
160
-
161
-
162
-
163
-
164
-
165
-
166
-
167
-
168
-
169
-
170
-
171
-
172
-
173
-
174
-
175
-
176
-
177
-
178
-
179
-
180
-
181
-
182
-
183
-
184
-
185
-
186
-
187
-
188
-
189
-
190
-
191
-
192
-
193
-
194
-
195
-
196
-
197
-
198
-
199
-
200
-
201
-
202
-
203
-
204
-
205
-
206
-
207
-
208
-
209
 |
 |
