Fluke 345 FE 345 Users Manual - Page 52
Step 2 - Logging Setup, Select the Logging Area using
 |
View all Fluke 345 manuals
Add to My Manuals
Save this manual to your list of manuals |
Page 52 highlights
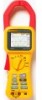
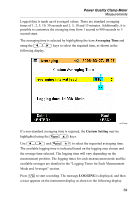
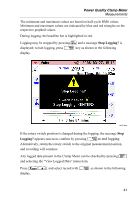
345 Users Manual The Battery Save function is still available when recording without the power adaptor connected. This function is switched on or off using the FG keys. In this mode the instrument switches itself off after approximately 5 minutes to preserve battery power. The initiation of the power down function is indicated by an intermittent audible bleep. Step 2 - Logging Setup: Logging (recording) is initiated by pressing and holding R for approximately 3 seconds or until the Logging Area screen is displayed. On pressing the R button again, the step-by -step recording process begins. The Clamp Meter has three logging areas available; recording area 1 is selected by default, as shown in the following display. eln22.bmp Select the Logging Area using F and G. There are actually four options to choose from: logging area 1, 2, and 3, or logging areas 1-2-3 combined for a longer logging time. Any data present in Logging Area will be over-written during the logging process. 38
-
 1
1 -
2
-
3
-
4
-
5
-
6
-
7
-
8
-
9
-
10
-
11
-
12
-
13
-
14
-
15
-
16
-
17
-
18
-
19
-
20
-
21
-
22
-
23
-
24
-
25
-
26
-
27
-
28
-
29
-
30
-
31
-
32
-
33
-
34
-
35
-
36
-
37
-
38
-
39
-
40
-
41
-
42
-
43
-
44
-
45
-
46
-
 47
47 -
 48
48 -
 49
49 -
 50
50 -
 51
51 -
 52
52 -
 53
53 -
 54
54 -
 55
55 -
 56
56 -
 57
57 -
58
-
59
-
60
-
61
-
62
-
63
-
64
-
65
-
66
-
67
-
68
-
69
-
70
-
71
-
72
-
73
-
74
-
75
-
76
-
77
-
78
-
79
-
80
 |
 |
