Fujitsu S510 Getting Started Guide - Page 12
Connecting the ScanSnap - scanner software
 |
UPC - 097564307218
View all Fujitsu S510 manuals
Add to My Manuals
Save this manual to your list of manuals |
Page 12 highlights
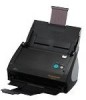
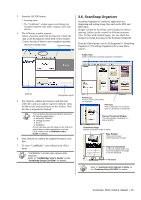
4. After the installation is completed, please restart your computer. Refer to the "ScanSnap S510 Operator's Guide" in the ScanSnap Setup CD-ROM to learn more about the installation of ScanSnap Manager, ScanSnap Organizer and CardMinder. 1. Remove the seal from the USB connector on the back side of the ScanSnap. 2. Connect the USB cable to the USB connector on the ScanSnap, and the other end of the USB cable into the USB port on your personal computer. 2.2. Connecting the ScanSnap After ScanSnap Manager has been installed and computer has been restarted, please connect the ScanSnap. 2.2.1. Connecting the AC cable CAUTION Do not use AC adapters other than the following Manufacturer LEI SANKEN ELECTRIC CO,. LTD AC-adapter model number NU40-2160250-I3 SEB55N2-16.0x (x= A-Z or Blank) 1. Connect the AC cable to the AC adapter (collectively called the power cable). Use only the supplied AC cable and AC adapter (power cable). 2. Plug the power cable into the power connector on the back side of the ScanSnap, and the other end to a wall outlet. Power connector Power cable Outlet USB cable 3. Open the Paper chute of ScanSnap. ScanSnap is automatically detected by your computer. 4. The ScanSnap is added as new hardware. How to add hardware varies depending on the operating system running on your computer. For Windows 2000 The "Digital Signature not Found" dialog box appears. Click the [Yes] button. The ScanSnap is added to your computer as new hardware. For Windows XP 1) When the "Found New Hardware Wizard" dialog box appears, select "No, not this time" and then click the [Next >] button. 2.2.2. Connecting the USB cable Follow the procedure below to connect the USB cable. ● Use only the USB cable supplied with this scanner. When connecting to a USB hub, be sure to connect the scanner to the hub nearest to your computer (first stage). If you connect it to a USB hub from the second stage onwards, ScanSnap may not operate correctly. ● If you connect the scanner with USB 2.0, it is required that the USB port and the Hub are compliant with USB 2.0. The scanning speed may slow down when you connect the scanner with USB 1.1. If your computer has the USB 2.0 compatible port, use it. *The window above only appears when the Service Pack 2 is installed. 2) Select how to install the software required for the hardware and click the [Next >]. The "Hardware Installation" dialog box appears. 10
-
 1
1 -
2
-
3
-
4
-
5
-
6
-
 7
7 -
 8
8 -
 9
9 -
 10
10 -
 11
11 -
 12
12 -
 13
13 -
 14
14 -
 15
15 -
 16
16 -
 17
17 -
18
-
19
-
20
-
21
-
22
-
23
-
24
-
25
-
26
-
27
-
28
 |
 |
