Fujitsu S510 Getting Started Guide - Page 14
How to Use ScanSnap - setup
 |
UPC - 097564307218
View all Fujitsu S510 manuals
Add to My Manuals
Save this manual to your list of manuals |
Page 14 highlights
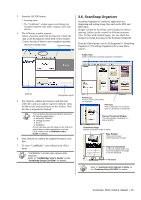
3. How to Use ScanSnap This chapter describes basic operation of ScanSnap. 3.1. Scanning Documents With "ScanSnap", you can turn paper office documents on your desk into digital files, save them, attach them to e-mail, print them, and convert them into Word/Excel/ PowerPoint data just by pressing a single button. The scanned image can be viewed on the screen using the supplied applications (Adobe Acrobat, ScanSnap Organizer, CardMinder). Three typical usages are: Create digital backups of general office documents in PDF format. You can edit them later using Adobe Acrobat. Adobe Acrobat allows you to make full use of the scanned information by using the OCR (Recognize Text Using OCR) function to recognize the image of the text portion, the security function to set passwords, etc. (Note: For information on using Adobe Acrobat, please refer to [Adobe Acrobat Help].) With the "Action List", attach the scanned documents to e-mail, print them out with a printer, share them over the network, as well as convert them into Word/Excel/ PowerPoint files by using the OCR function. Action List HINT The ScanSnap has frequently-used functions at the ready in the Action List to help you make efficient use of your time at your office. Refer to the "ScanSnap S510 Operator's Guide" in the ScanSnap Setup CD-ROM to learn more about the Action List. Scan and manage business cards. With "CardMinder", scan, recognize and edit business cards, and export the data to a popular personal information manager application such as Microsoft® Outlook®. 3.2. About the Scan Settings You can change ScanSnap settings by using "ScanSnap Manager". 1. Right-click the "ScanSnap Manager icon" S on the task bar and select [SCAN Button Settings] from the Right-click menu to change the setting at scanning with the [SCAN] button. 2. Change the scan settings on the "ScanSnap Manager Scan and Save Settings" dialog box. There are six tabs used to configure the scan options at maximum (The number of tabs displayed and items that can be configured vary depending on the Operation mode*.): [Application] Selects the application for viewing the scanned images. This is not displayed when the Quick Menu Mode is set (initial setting) in the "Settings...". [Save] Specifies the folder and file name to save the scanned images. [Scanning] Specifies the quality of the scanned image. [File option] Selects the file format (PDF, JPEG) for saving the scanned images. [Paper size] Selects the size of the document to be scanned and specifies the Carrier Sheet settings. [Compression] Selects the compression rate of a file. Operation Mode HINT ● There are two operation modes: [Quick Menu Mode] and [Left-Click Menu Mode]. Configurable items differ depending on the mode. The [Quick Menu Mode] is used by default. Scanning method in this mode is explained in this manual. ● Refer to the "ScanSnap S510 Operator's Guide" in the "ScanSnap Setup CD-ROM" to learn more about the [Left-Click Menu Mode]. The "ScanSnap Manager - Scan and Save Settings" dialog box appears. 3. Click the [OK] button to finish the configuration. The new settings are enabled. 12
-
 1
1 -
2
-
3
-
4
-
5
-
6
-
7
-
8
-
 9
9 -
 10
10 -
 11
11 -
 12
12 -
 13
13 -
 14
14 -
 15
15 -
 16
16 -
 17
17 -
 18
18 -
 19
19 -
20
-
21
-
22
-
23
-
24
-
25
-
26
-
27
-
28
 |
 |
