Fujitsu S510 Getting Started Guide - Page 27
ScanSnap S510 Getting Started | 25 - pick up rollers
 |
UPC - 097564307218
View all Fujitsu S510 manuals
Add to My Manuals
Save this manual to your list of manuals |
Page 27 highlights
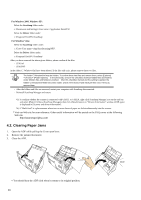
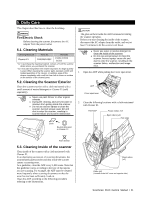
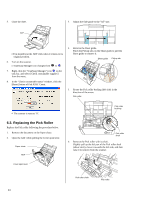
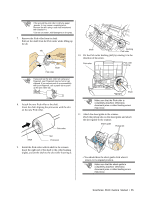
If the around the pick roller is dirty by paper -powder, it may cause a scanning error. Remove the dirt using a soft cloth moistened with Cleaner F1. * Do not use water, mild detergent or air-spray. 7. Remove the Pick roller from its shaft. Pull out the shaft from the Pick roller while lifting up its tab. Tab Shaft Pick roller Shaft Bushing Pick roller 10. Fix the Pick roller bushing (left) by rotating it in the direction of the arrow. Pick roller Pick roller bushing If you push up the pick roller tab using your fingernail, your fingernail may be hurt or get chipped. If you cannot push it up successfully with your fingernail, use a paper clip to push up the pick roller tab. 1 Shaft 2 8. Attach the new Pick roller to the shaft. Insert the shaft aligning the protrusion with the slot on the new Pick roller. Pick roller Make sure that the Pick roller is completely attached. Otherwise, document jams or other feeding errors may occur. 11. Attach the sheet guide to the scanner. Pinch the pickup tabs on the sheet guide and attach the sheet guide to the scanner. Sheet guide Pickup tab Shaft Slot Protrusion 9. Install the Pick roller with its shaft to the scanner. Insert the right end of the shaft to the roller bushing (right), and set the shaft to the slot while lowering it. You should hear the sheet guide click when it returns to its original position. Make sure that the sheet guide is completely attached. Otherwise, document jams or other feeding errors may occur. ScanSnap S510 Getting Started | 25
-
 1
1 -
2
-
3
-
4
-
5
-
6
-
7
-
8
-
9
-
10
-
11
-
12
-
13
-
14
-
15
-
16
-
17
-
18
-
19
-
20
-
21
-
 22
22 -
 23
23 -
 24
24 -
 25
25 -
 26
26 -
 27
27 -
 28
28
 |
 |
