Fujitsu S510 Getting Started Guide - Page 13
For Windows, Vista - windows 7 driver
 |
UPC - 097564307218
View all Fujitsu S510 manuals
Add to My Manuals
Save this manual to your list of manuals |
Page 13 highlights
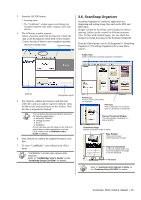
3) Click the [Continue Anyway] button. The "ScanSnap Manager" icon in the task bar is displayed as S . When the icon remains as , press the [POWER] button to turn off the scanner and then press the [POWER] button again to restart the scanner. (Allow at least 5 seconds when you turn on/off the scanner.) The window to notify completion of installation appears. 4) Click the [Finish] button. The ScanSnap is added to your computer as new hardware. For Windows Vista 1) When "Found New Hardware" window appears, Select "Locate and install driver software (recommended)". 2) On the "User Account Control" window, click the [Continue] button. 3) On the "Windows Security" window, select "Install this driver software anyway". The ScanSnap is added to your computer as new hardware. The installation of ScanSnap is complete! ScanSnap S510 Getting Started | 11
-
 1
1 -
2
-
3
-
4
-
5
-
6
-
7
-
 8
8 -
 9
9 -
 10
10 -
 11
11 -
 12
12 -
 13
13 -
 14
14 -
 15
15 -
 16
16 -
 17
17 -
 18
18 -
19
-
20
-
21
-
22
-
23
-
24
-
25
-
26
-
27
-
28
 |
 |
