Garmin Edge 1030 Owners Manual - Page 18
Fi Connected Features, Installing the Speed Sensor, Installing the Cadence Sensor
 |
View all Garmin Edge 1030 manuals
Add to My Manuals
Save this manual to your list of manuals |
Page 18 highlights
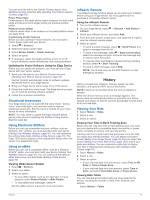
When you disable the bike alarm from your Edge device, you are prompted to enter the passcode. 3 Swipe down from the top of the screen, and on the controls widget, select Set Bike Alarm. If the device detects motion, it sounds an alarm and sends an alert to your connected smartphone. Playing Audio Prompts on Your Smartphone Before you can set up audio prompts, you must have a smartphone with the Garmin Connect app paired to your Edge device. You can set the Garmin Connect app to play motivational status announcements on your smartphone during a ride or other activity. Audio prompts include the lap number and lap time, navigation, power, pace or speed, and heart-rate data. During an audio prompt, the Garmin Connect app mutes the primary audio of the smartphone to play the announcement. You can customize the volume levels on the Garmin Connect app. 1 From the Garmin Connect app, select or . 2 Select Garmin Devices. 3 Select your device. 4 Select Device Settings > Audio Prompts. Transferring Files to Another Edge Device You can transfer courses, segments, and workouts wirelessly from one compatible Edge device to another using Bluetooth technology. 1 Turn on both Edge devices, and bring them within range (3 m) of each other. 2 From the device that contains the files, select > Connected Features > Device Transfers > Share Files. NOTE: The Device Transfers menu may be in a different location for other Edge devices. 3 Select a file type to share. 4 Select one or more files to transfer. 5 From the device that receives the files, select > Connected Features > Device Transfers. 6 Select a nearby connection. 7 Select one or more files to receive. A message appears on both devices after the file transfer is complete. Wi‑Fi Connected Features Activity uploads to your Garmin Connect account: Automatically sends your activity to your Garmin Connect account as soon as you finish recording the activity. Software updates: Your device downloads and installs the latest software update automatically when a Wi‑Fi connection is available. Workouts and training plans: You can browse for and select workouts and training plans on the Garmin Connect site. The next time your device has a Wi‑Fi connection, the files are wirelessly sent to your device. Setting Up Wi‑Fi Connectivity You must connect your device to the Garmin Connect app on your smartphone or to the Garmin Express application on your computer before you can connect to a Wi‑Fi network. 1 Select an option: • Download the Garmin Connect app, and pair your smartphone (Pairing Your Smartphone, page 1). • Go to www.garmin.com/express, and download the Garmin Express application. 2 Follow the on-screen instructions to set up Wi‑Fi connectivity. Wi‑Fi Settings Select > Connected Features > Wi-Fi. Wi-Fi: Enables Wi‑Fi wireless technology. NOTE: Other Wi‑Fi settings appear only when Wi‑Fi is enabled. Auto Upload: Allows you to upload activities automatically over a known wireless network. Add Network: Connects your device to a wireless network. Wireless Sensors Your device can be used with wireless ANT+ or Bluetooth sensors. For more information about compatibility and purchasing optional sensors, go to buy.garmin.com. Installing the Speed Sensor NOTE: If you do not have this sensor, you can skip this task. TIP: Garmin recommends you secure your bike on a stand while installing the sensor. 1 Place and hold the speed sensor on top of the wheel hub. 2 Pull the strap around the wheel hub, and attach it to the hook on the sensor. The sensor may be tilted when installed on an asymmetrical hub. This does not affect operation. 3 Rotate the wheel to check for clearance. The sensor should not contact other parts of your bike. NOTE: The LED flashes green for five seconds to indicate activity after two revolutions. Installing the Cadence Sensor NOTE: If you do not have this sensor, you can skip this task. TIP: Garmin recommends you secure your bike on a stand while installing the sensor. 1 Select the band size that fits your crank arm securely. The band you select should be the smallest one that stretches across the crank arm. 2 On the non-drive side, place and hold the flat side of the cadence sensor on the inside of the crank arm. 3 Pull the bands around the crank arm, and attach them to the hooks on the sensor. 14 Wireless Sensors
-
 1
1 -
2
-
3
-
4
-
5
-
6
-
7
-
8
-
9
-
10
-
11
-
12
-
 13
13 -
 14
14 -
 15
15 -
 16
16 -
 17
17 -
 18
18 -
 19
19 -
 20
20 -
 21
21 -
 22
22 -
 23
23 -
24
-
25
-
26
-
27
-
28
-
29
-
30
-
31
-
32
-
33
-
34
-
35
-
36
 |
 |
