Garmin Edge 1030 Owners Manual - Page 20
Pairing Your Wireless Sensors, Training with Power Meters
 |
View all Garmin Edge 1030 manuals
Add to My Manuals
Save this manual to your list of manuals |
Page 20 highlights
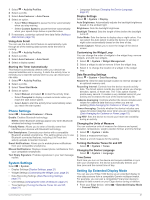
Tips for Erratic Heart Rate Data If the heart rate data is erratic or does not appear, you can try these tips. • Reapply water to the electrodes and contact patches (if applicable). • Tighten the strap on your chest. • Warm up for 5 to 10 minutes. • Follow the care instructions (Caring for the Heart Rate Monitor, page 22). • Wear a cotton shirt or thoroughly wet both sides of the strap. Synthetic fabrics that rub or flap against the heart rate monitor can create static electricity that interferes with heart rate signals. • Move away from sources that can interfere with your heart rate monitor. Sources of interference may include strong electromagnetic fields, some 2.4 GHz wireless sensors, high-voltage power lines, electric motors, ovens, microwave ovens, 2.4 GHz cordless phones, and wireless LAN access points. Pairing Your Wireless Sensors Before you can pair, you must put on the heart rate monitor or install the sensor. Pairing is the connecting of ANT+ or Bluetooth wireless sensors, for example, connecting a heart rate monitor with your Garmin device. 1 Bring the device within 3 m (10 ft.) of the sensor. NOTE: Stay 10 m (33 ft.) away from other riders' sensors while pairing. 2 Select > Sensors > Add Sensor. 3 Select an option: • Select a sensor type. • Select Search All to search for all nearby sensors. A list of available sensors appears. 4 Select one or more sensors to pair with your device. 5 Select Add. When the sensor is paired with your device, the sensor status is Connected. You can customize a data field to display sensor data. Training with Power Meters • Go to www.garmin.com/intosports for a list of ANT+ sensors that are compatible with your device (such as Vector™). • For more information, see the owner's manual for your power meter. • Adjust your power zones to match your goals and abilities (Setting Your Power Zones, page 16). • Use range alerts to be notified when you reach a specified power zone (Setting Range Alerts, page 20). • Customize the power data fields (Adding a Data Screen, page 19). Setting Your Power Zones The values for the zones are default values and may not match your personal abilities. You can manually adjust your zones on the device or using Garmin Connect. If you know your functional threshold power (FTP) value, you can enter it and allow the software to calculate your power zones automatically. 1 Select My Stats > Training Zones > Power Zones. 2 Enter your FTP value. 3 Select Based On:. 4 Select an option: • Select watts to view and edit the zones in watts. • Select % FTP to view and edit the zones as a percentage of your functional threshold power. Calibrating Your Power Meter Before you can calibrate your power meter, you must install it, pair it with your device, and begin actively recording data with it. For calibration instructions specific to your power meter, see the manufacturer's instructions. 1 Select > Sensors. 2 Select your power meter. 3 Select Calibrate. 4 Keep your power meter active by pedaling until the message appears. 5 Follow the on-screen instructions. Pedal-Based Power Vector measures pedal-based power. Vector measures the force you apply a few hundred times every second. Vector also measures your cadence or rotational pedaling speed. By measuring the force, the direction of force, the rotation of the crank arm, and time, Vector can determine power (watts). Because Vector independently measures left and right leg power, it reports your left-right power balance. NOTE: The Vector S system does not provide left-right power balance. Cycling Dynamics Cycling dynamics metrics measure how you apply power throughout the pedal stroke, and where you apply power on the pedal, allowing you to understand your particular way of riding. Understanding how and where you produce power allows you to train more efficiently and evaluate your bike fit. NOTE: You must have a dual sensing Edge system to use cycling dynamics metrics. For more information, go to www.garmin.com/performance-data. Using Cycling Dynamics Before you can use cycling dynamics, you must pair the Vector power meter with your device (Pairing Your Wireless Sensors, page 16). NOTE: Recording cycling dynamics uses additional device memory. 1 Go for a ride. 2 Scroll to the cycling dynamics screen to view your power phase data , total power , and platform center offset . 3 If necessary, hold a data field to change it (Adding a Data Screen, page 19). NOTE: The two data fields at the bottom of the screen can be customized. 16 Wireless Sensors
-
 1
1 -
2
-
3
-
4
-
5
-
6
-
7
-
8
-
9
-
10
-
11
-
12
-
13
-
14
-
 15
15 -
 16
16 -
 17
17 -
 18
18 -
 19
19 -
 20
20 -
 21
21 -
 22
22 -
 23
23 -
 24
24 -
 25
25 -
26
-
27
-
28
-
29
-
30
-
31
-
32
-
33
-
34
-
35
-
36
 |
 |
