Garmin Edge 1030 Owners Manual - Page 23
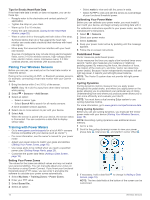
Profiles, About Training Settings - climbpro
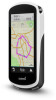 |
View all Garmin Edge 1030 manuals
Add to My Manuals
Save this manual to your list of manuals |
Page 23 highlights
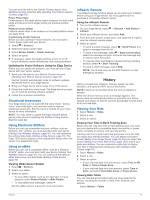
Data Fields: Allow you to download new data fields that present sensor, activity, and history data in new ways. You can add Connect IQ data fields to built-in features and pages. Widgets: Provide information at a glance, including sensor data and notifications. Apps: Add interactive features to your device, such as new outdoor and fitness activity types. Downloading Connect IQ Features Using Your Computer 1 Connect the device to your computer using a USB cable. 2 Go to apps.garmin.com, and sign in. 3 Select a Connect IQ feature, and download it. 4 Follow the on-screen instructions. Profiles The Edge has several ways for you to customize the device, including profiles. Profiles are a collection of settings that optimize your device based on how you are using it. For example, you can create different settings and views for training and mountain biking. When you are using a profile and you change settings such as data fields or units of measurement, the changes are saved automatically as part of the profile. Activity Profiles: You can create activity profiles for each type of biking. For example, you can create a separate activity profile for training, for racing, and for mountain biking. The activity profile includes customized data pages, activity totals, alerts, training zones (such as heart rate and speed), training settings (such as Auto Pause® and Auto Lap®), and navigation settings. User Profile: You can update your gender, age, weight, and height settings. The device uses this information to calculate accurate ride data. Setting Up Your User Profile You can update your gender, age, weight, and height settings. The device uses this information to calculate accurate ride data. 1 Select My Stats > User Profile. 2 Select an option. About Training Settings The following options and settings allow you to customize your device based on your training needs. These settings are saved to an activity profile. For example, you can set time alerts for your racing profile and you can set an Auto Lap position trigger for your mountain biking profile. Updating Your Activity Profile You can customize ten activity profiles. You can customize your settings and data fields for a particular activity or trip. 1 Select > Activity Profiles. 2 Select an option: • Select a profile. • Select Create New to add or copy a profile. 3 If necessary, edit the name and color for the profile. 4 Select an option: • Select Data Screens to customize the data screens and data fields (Adding a Data Screen, page 19). • Select Default Ride Type to set the type of ride that is typical for this activity profile, such as commuting. TIP: After a ride that is not typical, you can manually update the ride type. Accurate ride type data is important for creating bike friendly courses. • Select Segments to turn on your enabled segments (Enabling Segments, page 3). • Select ClimbPro to enable the ClimbPro feature (Using ClimbPro, page 11). • Select Alerts to customize your training alerts (Alerts, page 20). • Select Auto Features > Auto Lap to set how laps are triggered (Marking Laps by Position, page 20). • Select Auto Features > Auto Sleep to automatically enter sleep mode after five minutes of inactivity (Using Auto Sleep, page 20). • Select Auto Features > Auto Pause to change when the activity timer automatically pauses (Using Auto Pause, page 20). • Select Auto Features > Auto Scroll to customize the display of the training data screens when the activity timer is running (Using Auto Scroll, page 21). • Select Timer Start Mode to customize how the device detects the start of a ride and automatically starts the activity timer (Starting the Timer Automatically, page 21). • Select Nutrition/Hydration to enable food and drink consumption tracking. • Select Navigation > Map to customize the map settings (Map Settings, page 12). • Select Navigation > Routing to customize the routing settings (Route Settings, page 12). • Select Navigation > Navigation Prompts to show navigation messages using a map view or text prompt. • Select Navigation > Sharp Bend Warnings to enable navigation warning messages for difficult turns. • Select GPS Mode to turn off GPS (Training Indoors, page 5) or change the satellite setting (Changing the Satellite Setting, page 20). • Select Touch Sensitivity to change the sensitivity of the touchscreen. All changes are saved to the activity profile. Adding a Data Screen 1 Select > Activity Profiles. 2 Select a profile. 3 Select Data Screens > Add New > Data Screen. 4 Select a category, and select one or more data fields. 5 Select . 6 Select an option. • Select another category to select more data fields. • Select . 7 Swipe left or right to change the layout. 8 Select . 9 Select an option. • Tap a data field, then tap another data field to rearrange them. • Double-tap a data field to change it. 10Select . Editing a Data Screen 1 Select > Activity Profiles. 2 Select a profile. 3 Select Data Screens. 4 Select a data screen. 5 Select Layout and Data Fields. 6 Swipe left or right to change the layout. 7 Select . Customizing Your Device 19
-
 1
1 -
2
-
3
-
4
-
5
-
6
-
7
-
8
-
9
-
10
-
11
-
12
-
13
-
14
-
15
-
16
-
17
-
 18
18 -
 19
19 -
 20
20 -
 21
21 -
 22
22 -
 23
23 -
 24
24 -
 25
25 -
 26
26 -
 27
27 -
 28
28 -
29
-
30
-
31
-
32
-
33
-
34
-
35
-
36
 |
 |
