Garmin vivoactive 4/4S Owners Manual - Page 15
Indoor Activities, Outdoor Activities
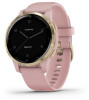 |
View all Garmin vivoactive 4/4S manuals
Add to My Manuals
Save this manual to your list of manuals |
Page 15 highlights
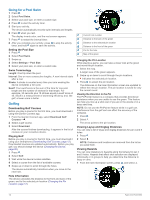
Your favorite activities appear at the top of the list with a gray background. Other activities appear in the extended list with a black background. 3 Select an option: • To add a favorite activity, select the activity, and select Add Favorite. • To remove a favorite activity, select the activity, and select Remove Favorite. Indoor Activities The vívoactive device can be used for training indoors, such as running on an indoor track or using a stationary bike. GPS is turned off for indoor activities. When running or walking with GPS turned off, speed, distance, and cadence are calculated using the accelerometer in the device. The accelerometer is self-calibrating. The accuracy of the speed, distance, and cadence data improves after a few outdoor runs or walks using GPS. TIP: Holding the handrails of the treadmill reduces accuracy. You can use an optional foot pod to record pace, distance, and cadence. When cycling with GPS turned off, speed and distance are not available unless you have an optional sensor that sends speed and distance data to the device (such as a speed or cadence sensor). Recording a Strength Training Activity You can record sets during a strength training activity. A set is multiple repetitions (reps) of a single move. 1 Press . 2 Select Strength. 3 Press to start the activity timer. 4 Start your first set. The device counts your reps. Your rep count appears when you complete at least four reps. TIP: The device can only count reps of a single move for each set. When you want to change moves, you should finish the set and start a new one. 5 Press to finish the set. The watch displays the total reps for the set. After several seconds, the rest timer appears. 6 If necessary, select Edit Weight, and edit the number of reps. TIP: You can also add the weight used for the set. 7 When you are done resting, press to start your next set. 8 Repeat for each strength training set until your activity is complete. 9 After you complete your activity, press , and swipe up to save the activity. Calibrating the Treadmill Distance To record more accurate distances for your treadmill runs, you can calibrate the treadmill distance after you run at least 1.5 km (1 mi.) on a treadmill. If you use different treadmills, you can manually calibrate the treadmill distance on each treadmill or after each run. 1 Start a treadmill activity (Starting an Activity, page 10). 2 Run on the treadmill until your vívoactive device records at least 1.5 km (1 mi.). 3 After you complete your run, press . 4 Check the treadmill display for the distance traveled. 5 Select an option: • To calibrate the first time, enter the treadmill distance on your device. Apps and Activities • To manually calibrate after the first-time calibration, swipe up, select Calibrate & Save, and enter the treadmill distance on your device. Outdoor Activities The vívoactive device comes preloaded with apps for outdoor activities, such as running and biking. GPS is turned on for outdoor activities. You can add apps using default activities, such as cardio or rowing. Going for a Run Before you can use a wireless sensor for your run, you must pair the sensor with your device (Pairing Your Wireless Sensors, page 19). 1 Put on your wireless sensors, such as a foot pod or heart rate monitor (optional). 2 Press . 3 Select Run. 4 When using optional wireless sensors, wait while the device connects to the sensors. 5 Go outside, and wait while the device locates satellites. 6 Press to start the activity timer. The device records activity data only while the activity timer is running. 7 Start your activity. 8 Select to record laps (optional) (Marking Laps Using the Auto Lap Feature, page 18). 9 Swipe up or down to scroll through data screens. 10After you complete your activity, press , and swipe up to save the activity. Going for a Ride Before you can use a wireless sensor for your ride, you must pair the sensor with your device (Pairing Your Wireless Sensors, page 19). 1 Pair your wireless sensors, such as a heart rate monitor, speed sensor, or cadence sensor (optional). 2 Press . 3 Select Bike. 4 When using optional wireless sensors, wait while the device connects to the sensors. 5 Go outside, and wait while the device locates satellites. 6 Press to start the activity timer. The device records activity data only while the activity timer is running. 7 Start your activity. 8 Swipe up or down to scroll through data screens. 9 After you complete your activity, press , and swipe up to save the activity. Viewing Your Ski Runs Your device records the details of each downhill skiing or snowboarding run using the auto run feature. This feature is turned on by default for downhill skiing and snowboarding. It automatically records new ski runs based on your movement. The timer pauses when you stop moving downhill and when you are on a chairlift. The timer remains paused during the chairlift ride. You can start moving downhill to restart the timer. You can view run details from the paused screen or while the timer is running. 1 Start a skiing or snowboarding activity. 2 Swipe up or down to view details of your last run, your current run, and your total runs. The run screens include time, distance traveled, maximum speed, average speed, and total descent. 11
-
 1
1 -
2
-
3
-
4
-
5
-
6
-
7
-
8
-
9
-
 10
10 -
 11
11 -
 12
12 -
 13
13 -
 14
14 -
 15
15 -
 16
16 -
 17
17 -
 18
18 -
 19
19 -
 20
20 -
21
-
22
-
23
-
24
-
25
-
26
-
27
-
28
-
29
-
30
-
31
-
32
 |
 |
