Harman Kardon AVR 354 Owners Manual - Page 43
Using, Docking Station - how to reset
 |
View all Harman Kardon AVR 354 manuals
Add to My Manuals
Save this manual to your list of manuals |
Page 43 highlights
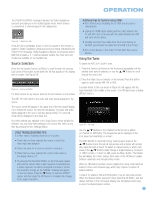
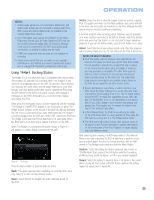
OPERATION NOTES: 1. Analog audio signals are not converted to digital form, and digital audio signals are not converted to analog audio form. Both coaxial and optical digital audio are available at the Coaxial Digital Audio Output. 2. Only PCM digital audio signals are available for recording. Proprietary formats such as Dolby Digital and DTS may not be recorded using the digital audio connections, although if the source is connected to the AVR using analog audio connections, an analog recording may be made. 3. HDMI and component video sources are not available for recording. 4. Please make certain that you are aware of any copyright restrictions on any material you record. Unauthorized duplication of copyrighted materials is prohibited by federal law. Using Docking Station The Bridge II is an included dock that is compatible with most docking iPod models, 4G and later (not included). When The Bridge II is connected to its proprietary input on the AVR 354 and the iPod is docked, you may play the audio, video and still-image materials on your iPod through your high-quality audio/video system, operate the iPod using the AVR remote or the AVR's front-panel controls, view navigation messages on the AVR's front panel or a connected video display, and charge the iPod. Either press the front-panel Source Selector repeatedly until the message "The Bridge is CONNECTED" appears in the front panel, or press The Bridge Source Selector on the remote. If the AVR has difficulty detecting that the iPod is connected and you have determined that The Bridge II is properly plugged into the AVR, turn off the AVR, remove the iPod from The Bridge II and reset the iPod as described in its user guide. When the iPod returns to its main menu, redock it and turn on the AVR. When The Bridge II is connected, the screen shown in Figure 61 will appear on a video display connected to the AVR. Figure 61 - The Bridge Press the Menu Button to view the slide-out menu: Back: This option appears while navigating the contents of the iPod only. Select it to return to the previous screen. Music: Select this line to navigate the audio materials stored on the iPod. Photos: Select this line to view still images stored on a photo-capable iPod. The system will switch to iPod Manual Mode, and control will shift to the iPod. Use the screen and controls on the iPod, although the AVR remote may be used for scrolling and selecting. If the iPod supports video browsing, visual materials may be displayed on a video monitor connected to the AVR as follows: Select the desired photo and press the Play Button on the iPod itself to begin slideshow playback. If you use the AVR's remote, press the OK Button three times. Videos: Select this line to view videos stored on an iPod that supports video browsing. Make sure the TV Out setting on the iPod is turned on. NOTES ON VIDEO PLAYBACK: • As of this writing, video browsing is only supported on the iPod 5G, iPod classic and iPod nano 3G. For other iPod models, it is not possible to view photos (except iPod 4G) or videos on an external monitor while using The Bridge II. However, you may purchase a compatible A/V cable from Apple Inc. that has a dock connector on one end and conventional audio and video plugs on the other end. The audio/video plugs may be connected to any available analog inputs on the AVR, as you would for any other source device. • Before attempting to view photos or videos stored on your iPod, check the Video Settings menu on the iPod and make sure that the TV Out setting is set to On. The TV Signal setting should be NTSC to match the capabilities of your video display. Set Widescreen to On or Off, depending on the aspect ratio of your video display. If your selection was playing and paused, the iPod requires you to reselect the video for the new TV Out setting to take effect. • In iPod Manual Mode, the iPod menus will only be visible on the iPod screen itself. You may operate the iPod using the AVR remote, as long as it is in The Bridge device mode. • The MP4 and H.264 video formats often used for videos to be played on the iPod are intended for optimal performance on the small screen of the iPod. Playback on larger displays may have different results. After selecting photo viewing, the AVR may remain in iPod Manual Mode, even after undocking the iPod or switching to another source input and back again. To return to normal operation, with the AVR remote in The Bridge mode, press and hold the Menu Button. Random: Select this setting for random playback, also known as "Shuffle Mode". Each press of the OK Button switches the setting: shuffle by Song, shuffle by Album, or Off to end random playback. Repeat: Select this setting to repeat a track or all tracks in the current album or play list. Each press of the OK Button switches the setting: repeat Off, repeat One or repeat All. 43
-
 1
1 -
2
-
3
-
4
-
5
-
6
-
7
-
8
-
9
-
10
-
11
-
12
-
13
-
14
-
15
-
16
-
17
-
18
-
19
-
20
-
21
-
22
-
23
-
24
-
25
-
26
-
27
-
28
-
29
-
30
-
31
-
32
-
33
-
34
-
35
-
36
-
37
-
 38
38 -
 39
39 -
 40
40 -
 41
41 -
 42
42 -
 43
43 -
 44
44 -
 45
45 -
 46
46 -
 47
47 -
 48
48 -
49
-
50
-
51
-
52
-
53
-
54
-
55
-
56
-
57
-
58
-
59
-
60
-
61
-
62
-
63
-
64
-
65
-
66
-
67
-
68
-
69
-
70
-
71
-
72
-
73
-
74
-
75
-
76
 |
 |
