Harman Kardon AVR 354 Owners Manual - Page 5
Table Of Contents - remote
 |
View all Harman Kardon AVR 354 manuals
Add to My Manuals
Save this manual to your list of manuals |
Page 5 highlights
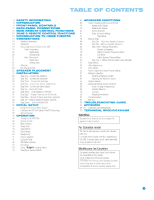
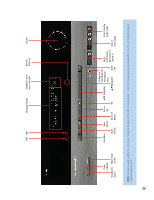
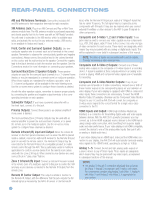
TABLE OF CONTENTS 2 SAFETY INFORMATION 6 INTRODUCTION 8 FRONT-PANEL CONTROLS 10 REAR-PANEL CONNECTIONS 13 MAIN REMOTE CONTROL FUNCTIONS 16 ZONE 2 REMOTE CONTROL FUNCTIONS 18 INTRODUCTION TO HOME THEATER 19 CONNECTIONS 19 Speaker Connections 19 Subwoofer 19 Connecting Source Devices to the AVR 20 Audio Connections 20 Digital Audio 20 Analog Audio 21 Video Connections 21 Digital Video 21 Analog Video 21 Antennas 22 RS-232 Serial Port 23 SPEAKER PLACEMENT 25 INSTALLATION 25 Step One - Connect the Speakers 25 Step Two - Connect the Subwoofer 25 Step Three - Connect the Antennas 25 Step Four - Connect the Source Components 29 Step Five - Connect the Video Display 30 Step Six - Plug in AC Power 30 Step Seven - Insert Batteries in Remote 31 Step Eight - Program Sources Into the Remote 32 Step Nine - Remote IR Inputs and Output (optional) 32 Step Ten - Install a Multizone System (optional) 33 Step Eleven - Turn On the AVR 354 35 INITIAL SETUP 35 Using the On-Screen Menu System 35 Configure the AVR 354 Using EzSet/EQ Technology 37 Set Up Sources 40 OPERATION 40 Turning On the AVR 354 40 Volume Control 40 Mute Function 40 Sleep Timer 40 Audio Effects 40 Video Modes 40 Headphones 41 Source Selection 41 Using the Tuner 42 XM Radio Operation 42 Recording 43 Using Docking Station 44 Selecting a Surround Mode 45 ADVANCED FUNCTIONS 45 Audio Processing and Surround Sound 45 Analog Audio Signals 45 Digital Audio Signals 45 Surround Modes 47 Dolby Surround Settings 47 Night Mode 48 Manual Setup 48 Step One - Determine Speaker Crossover 48 Step Two - Measure Speaker Distances 48 Step Three - Manual Setup Menu 49 Number of Speakers 49 Adjust Crossover Frequencies Menu 49 Sub Mode 50 Adjust Speaker Distance Menu 50 Step Four - Setting Channel Output Levels Manually 51 Audio Effects 52 Video Adjustments 52 Video Modes 53 How to Adjust the Custom Picture Settings 54 Multizone Operation 54 Installing a Multizone System 54 Operating the Multizone System 55 System Settings 56 Advanced Remote Control Functions 56 Punch-Through Programming 56 Activities (Macros) 56 Learning 56 Resetting the Remote 57 Processor Reset 57 Memory 58 TROUBLESHOOTING GUIDE 59 APPENDIX 66, 75 Trademark Acknowledgments 75 TECHNICAL SPECIFICATIONS WARNING To prevent fire or shock hazard, do not expose this appliance to rain or moisture. For Canadian model This Class B digital apparatus complies with Canadian ICES-003. For models having a power cord with a polarized plug: CAUTION: To prevent electric shock, match wide blade of plug to wide slot, fully insert. Modèle pour les Canadien Cet appareil numérique de la classe B est conforme à la norme NMB-003 du Canada. Sur les modèles dont la fiche est polarisee: ATTENTION: Pour éviter les chocs électriques, introduire la lame la plus large de la fiche dans la borne correspondante de la prise et pousser jusqu'au fond. 5
-
 1
1 -
 2
2 -
 3
3 -
 4
4 -
 5
5 -
 6
6 -
 7
7 -
 8
8 -
 9
9 -
 10
10 -
 11
11 -
12
-
13
-
14
-
15
-
16
-
17
-
18
-
19
-
20
-
21
-
22
-
23
-
24
-
25
-
26
-
27
-
28
-
29
-
30
-
31
-
32
-
33
-
34
-
35
-
36
-
37
-
38
-
39
-
40
-
41
-
42
-
43
-
44
-
45
-
46
-
47
-
48
-
49
-
50
-
51
-
52
-
53
-
54
-
55
-
56
-
57
-
58
-
59
-
60
-
61
-
62
-
63
-
64
-
65
-
66
-
67
-
68
-
69
-
70
-
71
-
72
-
73
-
74
-
75
-
76
 |
 |