Harman Kardon AVR 354 Owners Manual - Page 55
System Settings
 |
View all Harman Kardon AVR 354 manuals
Add to My Manuals
Save this manual to your list of manuals |
Page 55 highlights
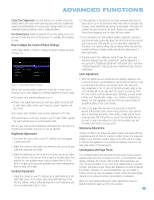
ADVANCED FUNCTIONS section of the Speaker Setup menu to configure the remote speakers with this setting at Main Room, and return this setting to Zone 2 when you have finished. To operate the multizone system using the main remote, slide the Zone Select Switch at the bottom of the remote to the "2" position (see Figure 75). To select a zone using the Zone 2 remote, press the Zone Selector, and the Zone Indicator will turn green when the remote is set to operate Zone 1, or red to operate Zone 2. Figure 75 - Zone Select Switch System Settings The AVR 354 offers system settings that allow you to make the receiver easier to use rather than directly affecting performance. These settings may be accessed from the System Settings menu, which is selected by pressing the AVR Button and navigating to the System line. Press the OK Button to display the System Settings menu. See Figure 76. Figure 76 - Systems Settings Screen Front Panel Dimmer: Some people find the front-panel messages distracting while watching a movie. The AVR 354 allows you to dim the front-panel lighting or turn it off altogether. When the display is partly or fully dimmed, it will return to full brightness for five seconds whenever a command is entered, and then it will dim again. Select On 100% for full brightness, dim to 50% or 25% of full brightness or select Off to fully darken the display. The light inside the Volume Control will go out when the display is partly or fully dimmed, but the Power Indicator will always remain lit to remind you that the AVR is powered on. General AVR Settings Volume Units: Select whether volume is displayed in the conventional decibel scale or on a numeric scale from 0 to 100. When the decibel scale is used, 0dB is the maximum volume, with lower volumes measured as negative values. Volume Default and Volume Default Level: These two settings are used together to program a volume level the AVR will always switch to when turned on. This feature avoids discomfort for listeners in case the last user turned the volume very high. Turn Volume Default on, and then set the Volume Default Level to the desired turn-on volume. Unit of Measure: This setting only affects the speaker-distance settings when performing Manual Speaker Setup. Select between meters and feet. iPod Charging: When The Bridge II is connected and an iPod is docked, the device's battery charges, as long as the AVR is powered on. When this setting is turned on, the device will continue to charge after the AVR has been powered down to Standby mode, and the AVR's Power Indicator will remain white to indicate that the charging circuitry is on. Language: Select the preferred language for the AVR's on-screen menus and displays: English, French, Spanish or German. HDMI Audio to TV: This setting determines whether audio signals received through any of the HDMI Inputs are passed through the HDMI Output to the video display. In normal operation, leave this setting Off, as audio will be played through the AVR rather than the video display's built-in speakers. However, sometimes you may wish to use the TV by itself, without using the complete home theater system. For those occasions change this setting to On. You may always mute the TV's speakers when using the AVR for audio. Menu Appearance OSD Transparency: This setting allows you to select whether video programs will be visible when the menu system is in use. Select Normal for a fully-transparent background, Medium for the menu background to be partially visible or Opaque to block the view of any video programs while the menus are on screen. Volume Status Messages: When the AVR is turned on, the volume is adjusted or the source is changed, or if a change in the input signal is detected, a status message will be displayed on screen. Use this setting to select how long the message remains visible. The setting varies from 2 to 10 seconds, with a default of 3 seconds. Menus: Some menu settings only remain in effect during the current listening session, including the settings in the Surround Modes, Video Modes and Audio Effects menus. This setting governs how long these menus will remain visible after your last adjustment, varying from 2 to 10 seconds, with a default of 3 seconds. Setup and Slide-In Menus: This setting determines how long the setup menus (Main Menu, Speaker Setup Menu, Zone 2 Menu, all slide-in menus) remain visible after your last adjustment. Select a timeout period of 5, 10 or 15 (the default) minutes, or no timeout, which leaves the menus on screen until you manually clear them. We recommend setting some timeout period to avoid the possibility of burn-in damage to plasma or CRT displays. 55
-
 1
1 -
2
-
3
-
4
-
5
-
6
-
7
-
8
-
9
-
10
-
11
-
12
-
13
-
14
-
15
-
16
-
17
-
18
-
19
-
20
-
21
-
22
-
23
-
24
-
25
-
26
-
27
-
28
-
29
-
30
-
31
-
32
-
33
-
34
-
35
-
36
-
37
-
38
-
39
-
40
-
41
-
42
-
43
-
44
-
45
-
46
-
47
-
48
-
49
-
 50
50 -
 51
51 -
 52
52 -
 53
53 -
 54
54 -
 55
55 -
 56
56 -
 57
57 -
 58
58 -
 59
59 -
 60
60 -
61
-
62
-
63
-
64
-
65
-
66
-
67
-
68
-
69
-
70
-
71
-
72
-
73
-
74
-
75
-
76
 |
 |
