Harman Kardon AVR 354 Owners Manual - Page 44
Selecting a Surround Mode
 |
View all Harman Kardon AVR 354 manuals
Add to My Manuals
Save this manual to your list of manuals |
Page 44 highlights
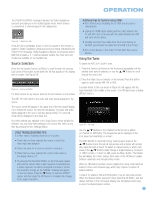
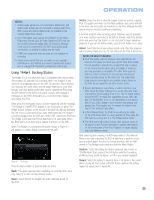
OPERATION NOTE: The iTunes application allows you to set certain selections to always be skipped in Shuffle mode. The AVR 354's settings cannot override these iTunes settings. Table 2 summarizes the controls available when The Bridge II is in use. Table 2 - Using The Bridge II iPod Function Play Pause Menu Select Scroll Reverse Scroll Forward Forward Search/Next Track Reverse Search/Previous Track Page Up/Down Remote Control Key Play (›) Pause (II) Menu OK Left Arrow (‹ ) Right Arrow ( ›) Forward/Next (››) Reverse/Previous (‹‹ ) Channel/Page Up/Down While scrolling, hold the key to scroll faster. Use the Page Up/Down control on the remote to scroll a page at a time. NOTES: • The Play and Pause functions are not available unless content has been selected for playback by navigating the menu system. • To search within a track, press and hold the indicated button. Pressing the Previous Track Button once skips to the beginning of the current track. Press the Previous Track Button twice to skip to the beginning of the previous track. While a selection is playing, the song title, artist and album name, if available on the iPod, will appear in the upper line in the front-panel Message Display. The lower line will display the elapsed time of the track on the left, the play mode icon, and the time remaining on the right. In addition, if a video monitor is connected to the AVR 354 and the system is not in iPod Manual Mode, it will display information about the status of the iPod and the track, including the play mode icon, the song title, artist and album. A graphic bar indicates the current play position within the track. If random or repeat play has been programmed, an icon will appear in the upper right corner. After a period of time, the screen may disappear from view. The length of time is set using the Setup and Slide-In Menus setting in the System Settings menu (described in the Advanced Functions section). You may restore the Now Playing screen to view by pressing either of the ‹/› Buttons. NOTE: It is strongly recommended that you use a screen saver built into your video display to avoid possible damage from "burn-in" that may occur with plasma and many CRT displays when a still image, such as a menu screen, remains on display for an extended period of time. Selecting a Surround Mode Surround mode selection can be as simple or sophisticated as your individual system and tastes. Feel free to experiment, and you may find a few favorites for certain sources or program types. More detailed information on surround modes may be found in the Advanced Functions section. To select a surround mode, press the Surround Modes Button (front panel or remote) repeatedly until the desired option appears: SURR: AUTO SELECT, SURR: VIRTUAL, SURR: STEREO, SURR: MOVIE, SURR: MUSIC or SURR: GAME. The Surround Modes menu will appear (see Figure 62). Press the OK Button to change the option's surround mode. Figure 62 - Surround Modes Menu Auto Select: For digital programs, such as movies recorded with a Dolby Digital soundtrack, the AVR will automatically use the native surround format. For 2-channel analog and PCM programs, the AVR is programmed to default to Logic 7 Movie mode. Virtual Surround: When only two main speakers are present in the system, Dolby Virtual Surround may be used to create an enhanced soundfield that virtualizes the missing speakers. Select between Wide and Reference modes, depending on your preferences. Stereo: When 2-channel playback is desired, select the number of speakers used for playback: • 2 CH STEREO for playback through only two speakers. As described on page 45, you may select Analog Bypass mode for a pure analog signal when analog audio inputs are in use. Simply set the Tone Control setting in the Audio Effects submenu to Off, and the AVR does the rest. • 5 CH STEREO for playing the left-channel signal through the front and surround left speakers, the right-channel signal through the right speakers and a summed mono signal through the center speaker. • 7 CH STEREO follows the same scheme as 5 CH STEREO, but adds the surround back speakers to the mix. This mode is only available when the surround back speakers are present and have not been reassigned to multizone operation. See the Initial Setup section for more information. Movie: Select an analog surround mode for movie playback: Logic 7 Movie, DTS Neo:6 Cinema or Dolby Pro Logic II (IIx when seven main speakers are present). The desired mode may also be selected when a compatible digital surround mode is received. 44 44
-
 1
1 -
2
-
3
-
4
-
5
-
6
-
7
-
8
-
9
-
10
-
11
-
12
-
13
-
14
-
15
-
16
-
17
-
18
-
19
-
20
-
21
-
22
-
23
-
24
-
25
-
26
-
27
-
28
-
29
-
30
-
31
-
32
-
33
-
34
-
35
-
36
-
37
-
38
-
 39
39 -
 40
40 -
 41
41 -
 42
42 -
 43
43 -
 44
44 -
 45
45 -
 46
46 -
 47
47 -
 48
48 -
 49
49 -
50
-
51
-
52
-
53
-
54
-
55
-
56
-
57
-
58
-
59
-
60
-
61
-
62
-
63
-
64
-
65
-
66
-
67
-
68
-
69
-
70
-
71
-
72
-
73
-
74
-
75
-
76
 |
 |
