HP 1200d HP Business Inkjet 1200 - Getting Started Guide - Page 11

小心地重新插入纸盘。

Page 11 highlights

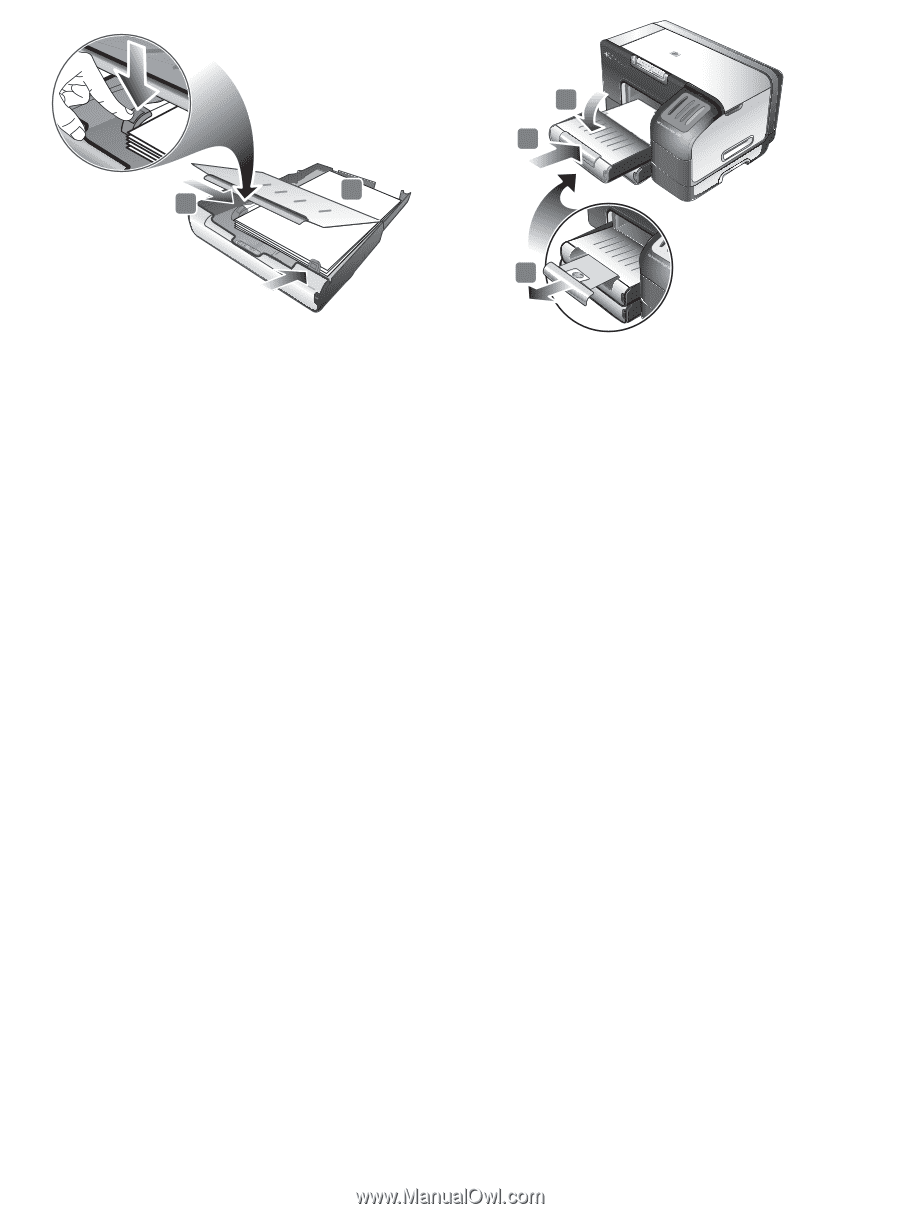
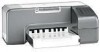
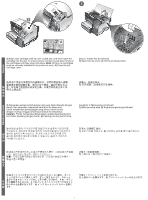
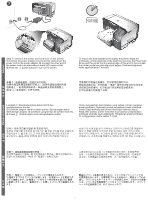
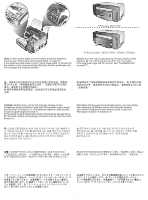
6 5 7 8 9 5) Slide the guides in the tray to adjust them for the size that you are loading. 6) Insert up to 150 sheets of paper into tray 1 or 250 sheets of paper into tray 2, print-side down along the right of the tray. Note: Tray 2 can be loaded only with plain paper. 7) Lower the output tray (if you loaded tray 1). 8) Gently reinsert the tray. 9) Pull out the extension on the output tray. 5 6) 将最多 150 1 250 2 2。 7 1)。 8 9 5) Geser pemandu kertas di dalam baki dan sesuaikan dengan ukuran kertas yang dimasukkan. 6) Isi paling banyak 150 lembar kertas ke dalam baki 1 atau 250 lembar ke baki 2; rapatkan kertas ke sebelah kanan baki dan sisi yang dicetak menghadap ke bawah. Catatan: Baki 2 hanya dapat diisi dengan kertas biasa. 7) Pasang kembali baki output (jika Anda mengisi Baki 1). 8) Pasang kembali baki dengan hati-hati. 9) Tarik keluar sambungan baki output. 5 6) 용지함 1에 최대 150 2에 최대 250 2 7 1 8 9 5 6 1 150 2 則為 250 2 7) 在紙匣 1 8 9 5 6 1 150 2 には 250 2 7 1 8 9 9

  • 1
  • 2
  • 3
  • 4
  • 5
  • 6
  • 7
  • 8
  • 9
  • 10
  • 11
  • 12
  • 13
  • 14
  • 15
  • 16
  • 17
  • 18
  • 19
  • 20
  • 21
  • 22
  • 23
  • 24
  • 25
  • 26
  • 27
  • 28
  • 29
  • 30
  • 31
  • 32
  • 33
  • 34
  • 35
  • 36
  • 37
  • 38
  • 39
  • 40
  • 41
  • 42
  • 43
  • 44
  • 45
  • 46
  • 47
  • 48
  • 49
  • 50
  • 51
  • 52
  • 53
  • 54
  • 55
  • 56
  • 57
  • 58
  • 59
  • 60
  • 61
  • 62
  • 63
  • 64
  • 65
  • 66
  • 67
  • 68

9
5)
Slide the guides in the tray to adjust them for the size that you are
loading.
6)
Insert up to 150 sheets of paper into tray 1 or 250 sheets
of paper into tray 2, print-side down along the right of the tray.
Note:
Tray 2 can be loaded only with plain paper.
7)
Lower the output tray (if you loaded tray 1).
8)
Gently reinsert
the tray.
9)
Pull out the extension on the output tray.
5)
滑动纸盘的导板,进行调整以适合要装入的纸张尺寸。
6)
将最多
150
页纸张插入纸盘
1
(或最多
250
页纸张插入
纸盘
2
),纸叠的打印面朝下并靠纸盘右侧放置。
注:
只能将普通纸装入纸盘
2
7)
降低出纸盘 (如已将纸张装入纸盘
1
)。
8)
小心地重新插入纸盘。
9)
拉出出纸盘的展板。
5)
Geser pemandu kertas di dalam baki dan sesuaikan dengan
ukuran kertas yang dimasukkan.
6)
Isi paling banyak 150 lembar
kertas ke dalam baki 1 atau 250 lembar ke baki 2; rapatkan kertas
ke sebelah kanan baki dan sisi yang dicetak menghadap ke bawah.
Catatan:
Baki 2 hanya dapat diisi dengan kertas biasa.
7)
Pasang kembali baki output (jika Anda mengisi Baki 1).
8)
Pasang kembali baki dengan hati-hati.
9)
Tarik keluar
sambungan baki output.
5)
공급하는
크기에
맞게
용지함
조정대를
조절하십시오
.
6)
용지함
1
최대
150
넣고
용지함
2
최대
250
넣고
인쇄면이
아래로
향하게
하여
용지함의
오른쪽에
밀착시켜
넣으십시오
.
:
용지함
2
에는
일반
용지만
넣을
있습니다
.
7)
출력
용지함을
내리십시오
(
용지함
1
용지를
넣은
경우
).
8)
용지함을
부드럽게
다시
끼우십시오
.
9)
출력
용지함에서
받침대를
잡아당기십시오
.
5)
按所裝入的紙張尺寸調整紙匣導桿。
6)
紙張裝入紙匣時,列印面
應朝下並貼齊紙匣右側,(紙匣
1
最多可裝
150
張紙,紙匣
2
則為
250
張)。
注意:
紙匣
2
只能裝普通紙。
7)
在紙匣
1
裝紙時,請將出紙匣朝下,
8)
將紙匣小心地插回原位。
9)
將出紙匣承板向外拉開。
5)
トレイのガイドを移動し、セットしている用紙サイズに調整
します。
6)
印刷面を下にしてトレイの右端に揃え、トレイ
1
には
最高
150
枚まで、トレイ
2
には
250
枚までセットできます。
注記:
トレイ
2
には普通紙しかセットできません。
7)
排紙トレイを下げます(トレイ
1
をセットした場合)。
8)
ゆっくりとトレイを挿入します。
9)
排紙トレイの拡張部を
引き出します。
5
6
8
7
9