HP 1200d HP Business Inkjet 1200 - Getting Started Guide - Page 14

Step 8: Connect the printer., Langkah 8: Menghubungkan printer. - cable

Page 14 highlights

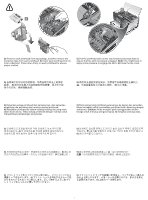
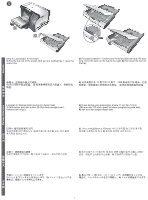
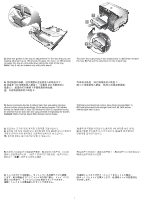
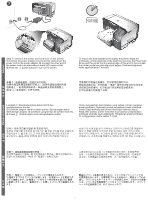
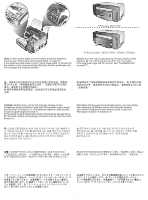
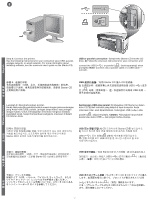
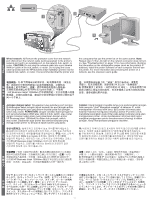
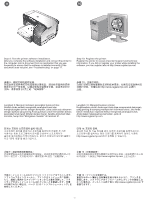
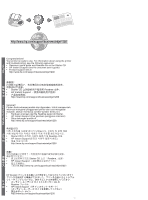
8 English Step 8: Connect the printer. See the following instructions for your connection type (USB, parallel, wireless network, or wired network). For more information about installing software, see the onscreen user's guide on the Starter CD. USB or parallel connection: 1) Insert the Starter CD into the CD drive. 2) Follow the onscreen instructions for your connection and connect the USB ( ) or parallel ( ) (sold separately) when prompted. Note: Connect only a parallel cable or a USB cable - not both. 步骤 8 USB Starter CD 文 USB 1) 将 Starter CD 插入 CD 2 USB ( ) 或并 USB Langkah 8: Menghubungkan printer. Harap lihat petunjuk-petunjuk berikut sesuai dengan jenis sambungan yang Anda miliki (USB, paralel, jaringan tanpa-kabel, atau jaringan dengan kabel). Untuk mendapatkan informasi mengenai instalasi perangkat lunak, harap lihat panduan pengguna onscreen di dalam CD Starter Anda. Sambungan USB atau paralel: 1) Masukkan CD Starter ke dalam drive CD. 2) Ikuti instruksi yang tampil di layar komputer Anda (onscreen) dan, saat diperintahkan, hubungkan USB ( ) atau paralel ( ) (dijual terpisah). Catatan: Hubungkan hanya kabel paralel atau kabel USB - tapi jangan kedua-duanya. Bahasa Indonesia 단계 8 USB 한 국 Starter CD 어 USB 1) CD Starter CD 2 USB USB 步驟 8 USB Starter CD USB 1) 將 Starter CD 2 USB USB 纜線。 手順 8 USB 日 CD にある 語 USB 1 CD を CD 2 USB USB 12

  • 1
  • 2
  • 3
  • 4
  • 5
  • 6
  • 7
  • 8
  • 9
  • 10
  • 11
  • 12
  • 13
  • 14
  • 15
  • 16
  • 17
  • 18
  • 19
  • 20
  • 21
  • 22
  • 23
  • 24
  • 25
  • 26
  • 27
  • 28
  • 29
  • 30
  • 31
  • 32
  • 33
  • 34
  • 35
  • 36
  • 37
  • 38
  • 39
  • 40
  • 41
  • 42
  • 43
  • 44
  • 45
  • 46
  • 47
  • 48
  • 49
  • 50
  • 51
  • 52
  • 53
  • 54
  • 55
  • 56
  • 57
  • 58
  • 59
  • 60
  • 61
  • 62
  • 63
  • 64
  • 65
  • 66
  • 67
  • 68

English
Bahasa Indonesia
12
Step 8: Connect the printer.
See the following instructions for your connection type (USB, parallel,
wireless network, or wired network). For more information about
installing software, see the onscreen user’s guide on the Starter CD.
USB or parallel connection:
1)
Insert the Starter CD into the CD
drive.
2)
Follow the onscreen instructions for your connection and
connect the USB (
) or parallel (
) (sold separately) when
prompted.
Note:
Connect only a parallel cable or a USB cable —
not both.
步骤
8
:连接打印机。
连接
类型
USB
、并行、
线
网络
或有线
网络
)的
信息
查看
以下说明。有
安装软件的
详细信息
,请参阅
Starter CD
上的联机用户指南。
USB
或并行连接:
1)
Starter CD
插入
CD
动器。
2)
提示时,按照
屏幕
上有
连接的说明连接
USB (
)
或并
(
)
电缆(单
)。
注:
仅连接并行电缆或
USB
电缆
而不
是同
时连接两
Langkah 8: Menghubungkan printer.
Harap lihat petunjuk-petunjuk berikut sesuai dengan jenis sambungan
yang Anda miliki (USB, paralel, jaringan tanpa-kabel, atau jaringan
dengan kabel). Untuk mendapatkan informasi mengenai instalasi
perangkat lunak, harap lihat panduan pengguna onscreen di dalam
CD Starter Anda.
Sambungan USB atau paralel:
1)
Masukkan CD Starter ke dalam
drive CD.
2)
Ikuti instruksi yang tampil di layar komputer Anda
(onscreen) dan, saat diperintahkan, hubungkan USB (
) atau
paralel (
) (dijual terpisah).
Catatan:
Hubungkan hanya kabel
paralel atau kabel USB — tapi jangan kedua-duanya.
단계
8:
프린터
연결
.
아래의
연결
형태별
(USB,
병렬
,
무선
네트워크
또는
유선
네트워크
)
지침을
참조하십시오
.
소프트웨어
설치에
대한
자세한
내용은
Starter CD
온라인
사용자
설명서를
참조하십시오
.
USB
또는
병렬
연결
:
1)
CD
드라이브에
Starter CD
넣으십시오
.
2)
지시가
있으면
해당
연결
형태에
대한
온라인
지침을
따라
USB (
)
또는
병렬
(
)(
별매
)
케이블을
연결하십시오
.
:
병렬
케이블
또는
USB
케이블
하나만
사용하고
모두
사용하지
마십시오
.
步驟
8
:連結印表機。
請參
閱各
連結
型(
USB
平行
、無線或有線
網路
)的
相關
說明。
安裝軟體的
詳細
說明,請參
Starter CD
內的線上使用者手冊。
USB
或平行連結
1)
Starter CD
插入
光碟
機。
2)
連結的線上
說明
進行
,並於
示時插入
USB (
)
平行纜
(
)
線須
)。
注意:
切勿同時插入
平行
USB
線。
手順
8
:プリンタの接続。
接続タイプ(
USB
、パラレル、ワイヤレス
ネットワーク、または
ワイヤド
ネットワーク)について以下の手順をご覧ください。
ソフトウェアのインストール手順については、スタータ
CD
にある
オンライン
ユーザーズ
ガイドを参照してください。
USB
またはパラレル接続:
1)
スターター
CD
CD
ドライブに挿入
します。
2)
画面の指示に従って、プロンプトが表示されたら
USB
(
)
またはパラレル
(
)
(別売)接続を行います。
メモ:
パラレル
ケーブルまたは
USB
のどちらか一つのみを接続し
ます。両方接続しないでください。
8