HP 1200d HP Business Inkjet 1200 - Getting Started Guide - Page 9

Catatan

Page 9 highlights

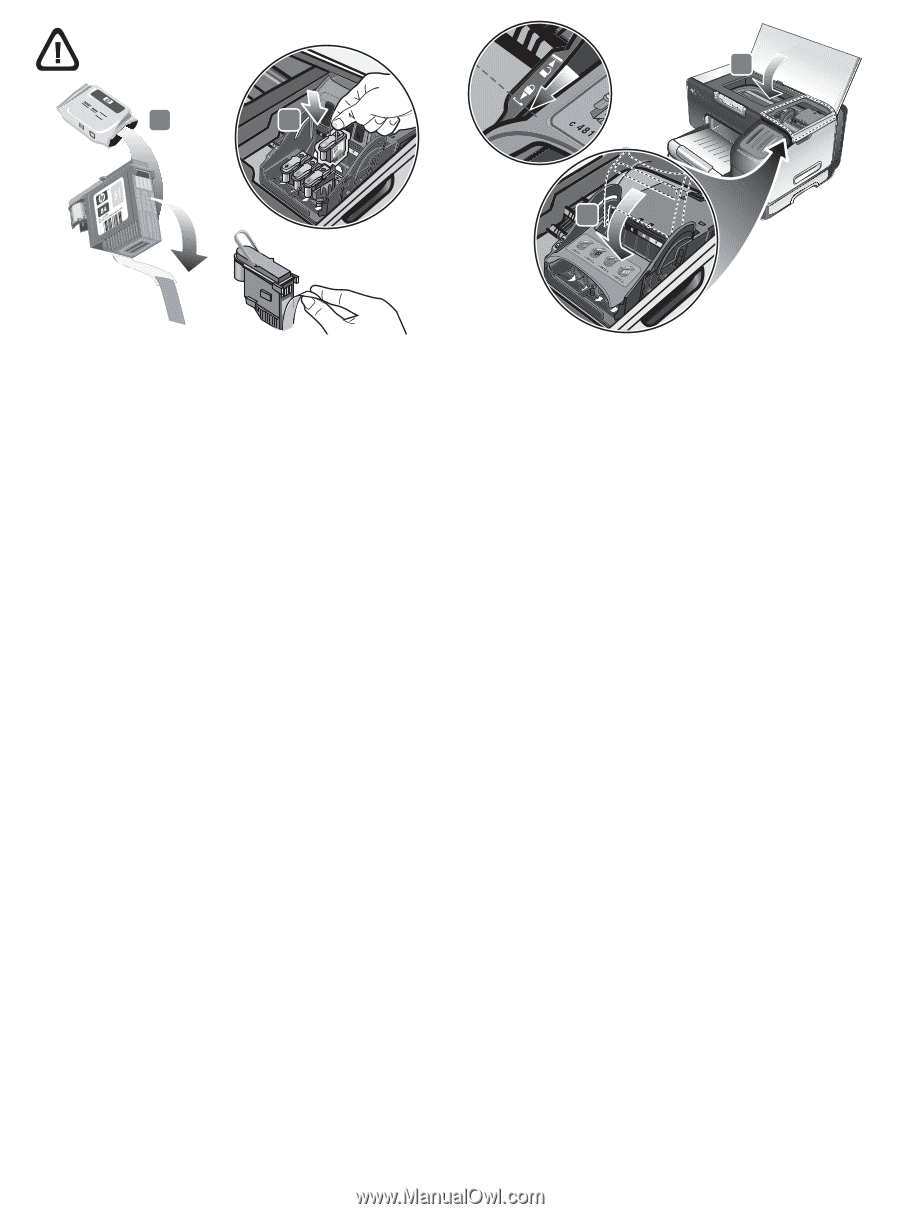
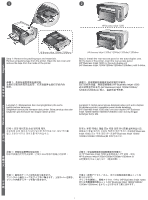
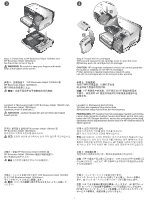
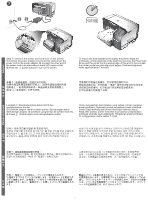
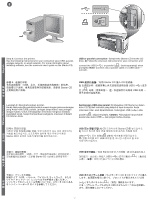
3 4 6 5 3) Remove each printhead from its package, and then remove the protective tape from each printhead. 4) Insert each printhead into its color-coded slot. Press down firmly on each printhead to ensure proper contact. 5) Pull the printhead latch all the way forward and press down to ensure that the latch is properly engaged. Note: You might have to apply some pressure to engage the latch. 6) Close the top cover. 3 4 5 6 3) Keluarkan setiap printhead dari kemasannya, dan kemudian singkirkan pita pelindung dari masing-masing printhead. 4) Masukkan printhead ke dalam masing-masing slot yang telah diberi kode warna. Tekan setiap printhead dengan mantap untuk menyakinkan pemasangan yang benar. 5) Tarik pengancing printhead sepenuhnya ke depan dan kemudian tekan ke bawah untuk memastikan printhead telah dikancing dengan sempurna. Catatan: Anda mungkin perlu menggunakan sedikit tenaga untuk menutup pengancingnya. 6) Tutupkan penutup atas. 3 4 5 6 3 4 5 6 3 4 5 6 7

  • 1
  • 2
  • 3
  • 4
  • 5
  • 6
  • 7
  • 8
  • 9
  • 10
  • 11
  • 12
  • 13
  • 14
  • 15
  • 16
  • 17
  • 18
  • 19
  • 20
  • 21
  • 22
  • 23
  • 24
  • 25
  • 26
  • 27
  • 28
  • 29
  • 30
  • 31
  • 32
  • 33
  • 34
  • 35
  • 36
  • 37
  • 38
  • 39
  • 40
  • 41
  • 42
  • 43
  • 44
  • 45
  • 46
  • 47
  • 48
  • 49
  • 50
  • 51
  • 52
  • 53
  • 54
  • 55
  • 56
  • 57
  • 58
  • 59
  • 60
  • 61
  • 62
  • 63
  • 64
  • 65
  • 66
  • 67
  • 68

7
3)
Remove each printhead from its package, and then remove the
protective tape from each printhead.
4)
Insert each printhead into its
color-coded slot. Press down firmly on each printhead to ensure
proper contact.
5)
Pull the printhead latch all the way forward and press down to
ensure that the latch is properly engaged.
Note:
You might have to
apply some pressure to engage the latch.
6)
Close the top cover.
3)
去除每个打印头的包装材料,然后去除打印头上的保护
胶带。
4)
将打印头插入对应的颜色代码插槽。用力往下按
各个打印头,确保接触良好。
5)
将打印头锁栓向前拉到头,然后按下以确保锁栓正确扣上。
注:
可能需要用些力才能扣上锁栓。
6)
合上顶盖。
3)
Keluarkan setiap printhead dari kemasannya, dan kemudian
singkirkan pita pelindung dari masing-masing printhead.
4)
Masukkan printhead ke dalam masing-masing slot yang telah
diberi kode warna. Tekan setiap printhead dengan mantap untuk
menyakinkan pemasangan yang benar.
5)
Tarik pengancing printhead sepenuhnya ke depan dan kemudian
tekan ke bawah untuk memastikan printhead telah dikancing dengan
sempurna.
Catatan:
Anda mungkin perlu menggunakan sedikit
tenaga untuk menutup pengancingnya.
6)
Tutupkan penutup atas.
3)
인쇄헤드의
포장을
떼어낸
다음
인쇄헤드
보호
테이프를
벗겨내십시오
.
4)
인쇄헤드를
색상별
슬롯에
삽입하십시오
.
인쇄헤드를
세게
눌러서
접촉이
이뤄지도록
합니다
.
5)
인쇄헤드
걸쇠를
앞쪽으로
당기고
눌러
걸쇠가
제대로
결합되도록
하십시오
.
:
걸쇠를
결합하기
위해서는
약간의
힘을
주어야
합니다
.
6)
상단
커버를
닫으십시오
.
3)
自包裝箱中取出印字頭,然後移除印字頭上的保護膠帶。
4)
將印字
頭插入同色標記的插槽中。用力往下按每個印字頭,確定接觸良好。
5)
將印字頭栓向前拉到底後向下壓,使印字頭栓扣好。
注意:
您可能需要用些力才能扣好鎖栓。
6)
將上蓋蓋好。
3)
プリント
ヘッドをパッケージから取り出し、プリントヘッドから
保護テープをはがします。
4)
プリント
ヘッドを対応するカラーで色
分けされているスロットに挿入します。正しく接するように各プリ
ント
ヘッドをしっかりと押し下げてください。
5)
プリントヘッド
ラッチを前面に引き出し、ラッチが正しく挿入さ
れるよう押し下げます。
メモ:
ラッチを閉じるには、多少力を加え
る必要があります。
6)
上部カバーを閉じます。
4
3
5
6