HP 1200d HP Business Inkjet 1200 - Getting Started Guide - Page 8

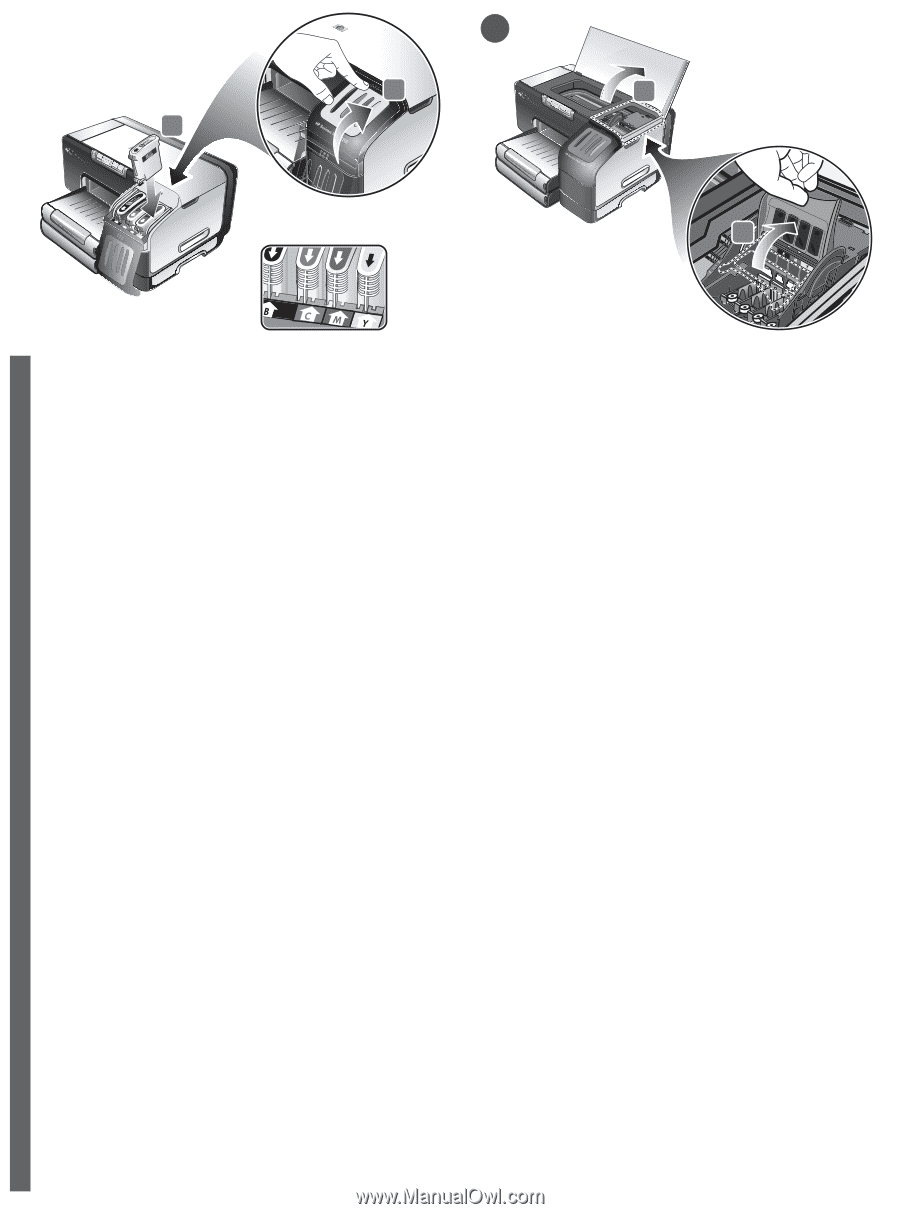
Step 5: Install the printheads., Langkah 5: Memasang printhead.

Page 8 highlights

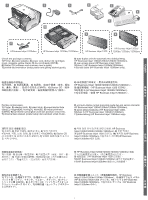
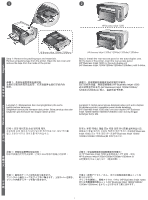
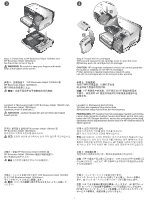
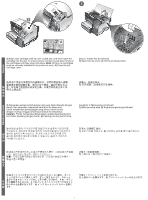
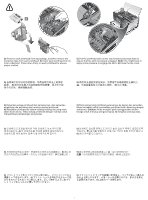
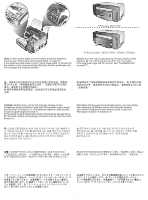
5 4 1 3 2 3) Align each cartridge with its color-coded slot, and then insert the cartridge into the slot. To ensure proper contact, press down firmly on the cartridges until they snap into place. Note: All four ink cartridges must be correctly installed for the printer to work. 4) Close the ink cartridge cover. Step 5: Install the printheads. 1) Open the top cover. 2) Lift the printhead latch. English 3 4 步骤 5 1 2 3) Sejajarkan setiap kartrid dengan slot yang telah ditandai dengan warna, dan kemudian masukkan kartrid itu ke dalam slot. Untuk meyakinkan pemasangan yang benar, tekan kartrid dengan mantap hingga kartrid tepat masuk ke tempatnya. Catatan: Printer hanya bisa dioperasikan apabila keempat kartrid tinta telah dipasang dengan benar. 4) Pasang penutup kartrid tinta. Langkah 5: Memasang printhead. 1) Buka penutup atas. 2) Angkat pengancing printhead Bahasa Indonesia 3 한 국 4 4 어 단계 5 1 2 3 4 中 文 步驟 5 1 2 3 日 4 4 手順 5 1 2 6

  • 1
  • 2
  • 3
  • 4
  • 5
  • 6
  • 7
  • 8
  • 9
  • 10
  • 11
  • 12
  • 13
  • 14
  • 15
  • 16
  • 17
  • 18
  • 19
  • 20
  • 21
  • 22
  • 23
  • 24
  • 25
  • 26
  • 27
  • 28
  • 29
  • 30
  • 31
  • 32
  • 33
  • 34
  • 35
  • 36
  • 37
  • 38
  • 39
  • 40
  • 41
  • 42
  • 43
  • 44
  • 45
  • 46
  • 47
  • 48
  • 49
  • 50
  • 51
  • 52
  • 53
  • 54
  • 55
  • 56
  • 57
  • 58
  • 59
  • 60
  • 61
  • 62
  • 63
  • 64
  • 65
  • 66
  • 67
  • 68

English
Bahasa Indonesia
6
3)
Align each cartridge with its color-coded slot, and then insert the
cartridge into the slot. To ensure proper contact, press down firmly on
the cartridges until they snap into place.
Note:
All four ink cartridges
must be correctly installed for the printer to work.
4)
Close the ink
cartridge cover.
Step 5: Install the printheads.
1)
Open the top cover.
2)
Lift the printhead latch.
3)
将各个墨盒与其颜色代码插槽对齐,然后将墨盒插入插槽。
要确保正确的接触位置,请用力按下墨盒,直到卡到位为止。
注:
所有四个墨盒都必须安装正确,以便打印机能正常工作。
4)
合上墨盒盖。
步骤
5
:安装打印头。
1)
打开顶盖。
2)
提起打印头锁栓。
3)
Sejajarkan setiap kartrid dengan slot yang telah ditandai dengan
warna, dan kemudian masukkan kartrid itu ke dalam slot.
Untuk meyakinkan pemasangan yang benar, tekan kartrid
dengan mantap hingga kartrid tepat masuk ke tempatnya.
Catatan:
Printer hanya bisa dioperasikan apabila keempat kartrid
tinta telah dipasang dengan benar.
4)
Pasang penutup kartrid tinta.
Langkah 5: Memasang printhead.
1)
Buka penutup atas.
2)
Angkat pengancing printhead
3)
색상별
슬롯에
카트리지를
정렬한
다음
슬롯에
카트리지를
끼우십시오
.
제자리에
맞춰질
때까지
카트리지를
눌러
카트리지가
올바로
설치되도록
하십시오
.
:
4
개의
잉크
카트리지를
모두
올바로
설치해야
제대로
인쇄할
있습니다
.
4)
잉크
카트리지
커버를
닫으십시오
.
단계
5:
인쇄헤드
설치
.
1)
상단
커버를
여십시오
.
2)
인쇄헤드
걸쇠를
들어
올리십시오
.
3)
將墨水匣對準同色標示的墨水匣槽後插入槽內。為確使墨水匣接觸
良好,請用力按下墨水匣,直到卡入定位為止。
注意:
所有四個墨水匣都必須安裝正確,印表機才能能正常運作。
4)
蓋上墨水匣護蓋。
步驟
5
:安裝印字頭。
1)
打開上蓋。
2)
拉起印字頭鎖栓。
3)
各カートリッジをカラーコードされたスロットに揃え、カート
リッジをスロットに挿入します。正しく接するように、カチッと
音がするまでカートリッジをしっかり押し下げます。
メモ:
プリン
タが機能するためには、
4
つのインク
カートリッジすべてを正しく
取り付ける必要があります。
4)
インク
カートリッジ
カバーを閉じ
ます。
手順
5
:プリント
ヘッドを取り付ける。
1)
上部カバーを開きます。
2)
プリントヘッド
ラッチを上げます。
4
3
5
2
1