HP 2175 HP PSC 2170 series all-in-one - (English) Reference Guide - Page 9
front panel overview, tutorial, before you begin, front panel features - software
 |
UPC - 808736517126
View all HP 2175 manuals
Add to My Manuals
Save this manual to your list of manuals |
Page 9 highlights
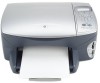
front panel overview 2 You can perform many functions using either the front panel or the HP PSC software. Even if you do not connect your HP PSC to a computer, you can use the front panel to copy documents or photos, print a proof sheet for a photo card, and print photos from a photo card. You can change a wide variety of settings using the front-panel buttons and menu system. tutorial This brief tutorial teaches you how to use your HP PSC to make a copy, adjust copy settings, and print a report. This is not a comprehensive tutorial; its purpose is to familiarize you with the front panel and the different buttons. It should take about ten minutes to complete the tutorial, after which you can experiment on your own. Note: We highly recommend that you take this tutorial before you start using your HP PSC for daily tasks. Review the table of contents or the index to find out about the other front-panel tasks covered in this online help. • before you begin • front panel features • make a copy • enhance your copy • setup button before you begin Do the following: • Follow the instructions in the Setup Poster to set up your HP PSC. You should install the HP PSC software before connecting the HP PSC to the computer. • Make sure paper is loaded in the paper tray. If you need more information, see load paper on page 9. • Have available a color photograph or picture that is smaller than Letter or A4 size. You will use this image for tutorial activities. • Obtain a two or three-page document. You will use it for tutorial activities. front panel features Review the illustrations below and identify the location of the buttons on the front panel. 3
-
 1
1 -
2
-
3
-
 4
4 -
 5
5 -
 6
6 -
 7
7 -
 8
8 -
 9
9 -
 10
10 -
 11
11 -
 12
12 -
 13
13 -
 14
14 -
15
-
16
-
17
-
18
-
19
-
20
-
21
-
22
-
23
-
24
-
25
-
26
-
27
-
28
-
29
-
30
-
31
-
32
-
33
-
34
-
35
-
36
-
37
-
38
-
39
-
40
-
41
-
42
-
43
-
44
-
45
-
46
-
47
-
48
-
49
-
50
-
51
-
52
-
53
-
54
-
55
-
56
-
57
-
58
-
59
-
60
-
61
-
62
-
63
-
64
-
65
-
66
-
67
-
68
-
69
-
70
-
71
-
72
-
73
-
74
-
75
-
76
-
77
-
78
-
79
-
80
 |
 |
