HP 2200 HP LaserJet 2200 series printer - Getting Started Guide - Page 12
Optional 500-Sheet Tray 3, as possible.
 |
View all HP 2200 manuals
Add to My Manuals
Save this manual to your list of manuals |
Page 12 highlights
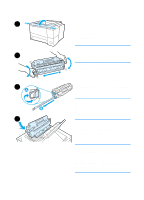
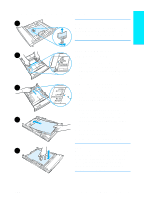
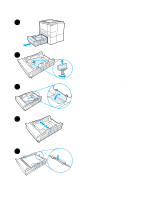
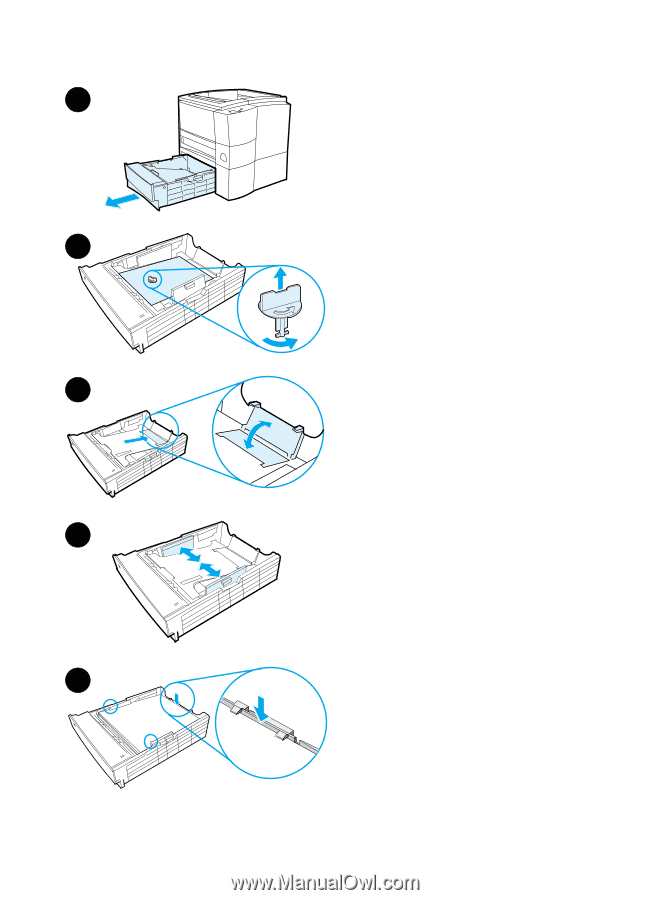
Optional 500-Sheet Tray 3 1 1 Pull the tray out of the printer. 2 Locate the orange plastic packaging piece that is holding down the tray. Turn it counter-clockwise and lift up to remove. 3 To adjust for letter-size paper, pull up on the rear stop, or to adjust for A4-size paper, push the rear paper 2 stop down. 4 For letter-size paper, move the side width guides outward as far as possible, or for A4-size paper, move the side width guides inward as far as possible. 5 Add the media and make sure that it is flat in the tray. Keep the media 3 below the hooks on the side and rear of the tray. 6 Slide the tray back into the printer. 4 5 8 ENWW
-
 1
1 -
2
-
3
-
4
-
5
-
6
-
 7
7 -
 8
8 -
 9
9 -
 10
10 -
 11
11 -
 12
12 -
 13
13 -
 14
14 -
 15
15 -
 16
16 -
 17
17 -
18
-
19
-
20
-
21
-
22
-
23
-
24
-
25
-
26
-
27
-
28
-
29
-
30
-
31
-
32
-
33
-
34
-
35
-
36
-
37
-
38
-
39
-
40
-
41
-
42
-
43
-
44
-
45
-
46
-
47
-
48
-
49
-
50
-
51
-
52
-
53
-
54
-
55
-
56
-
57
-
58
-
59
-
60
-
61
-
62
-
63
-
64
-
65
-
66
-
67
-
68
-
69
-
70
-
71
-
72
-
73
-
74
-
75
-
76
-
77
-
78
-
79
-
80
-
81
-
82
-
83
-
84
-
85
-
86
-
87
-
88
 |
 |
8
ENWW
Optional 500-Sheet Tray 3
1
Pull the tray out of the printer.
2
Locate the orange plastic packaging
piece that is holding down the tray.
Turn it counter-clockwise and lift up
to remove.
3
To adjust for letter-size paper, pull up
on the rear stop, or to adjust for
A4-size paper, push the rear paper
stop down.
4
For letter-size paper, move the side
width guides outward as far as
possible, or for A4-size paper, move
the side width guides inward as far
as possible.
5
Add the media and make sure that
it is flat in the tray. Keep the media
below the hooks on the side and rear
of the tray.
6
Slide the tray back into the printer.
1
2
3
4
5