HP 2200 HP LaserJet 2200 series printer - Getting Started Guide - Page 14
To connect your printer cable, To connect a network cable to an Ethernet 10/100 Base-TX
 |
View all HP 2200 manuals
Add to My Manuals
Save this manual to your list of manuals |
Page 14 highlights
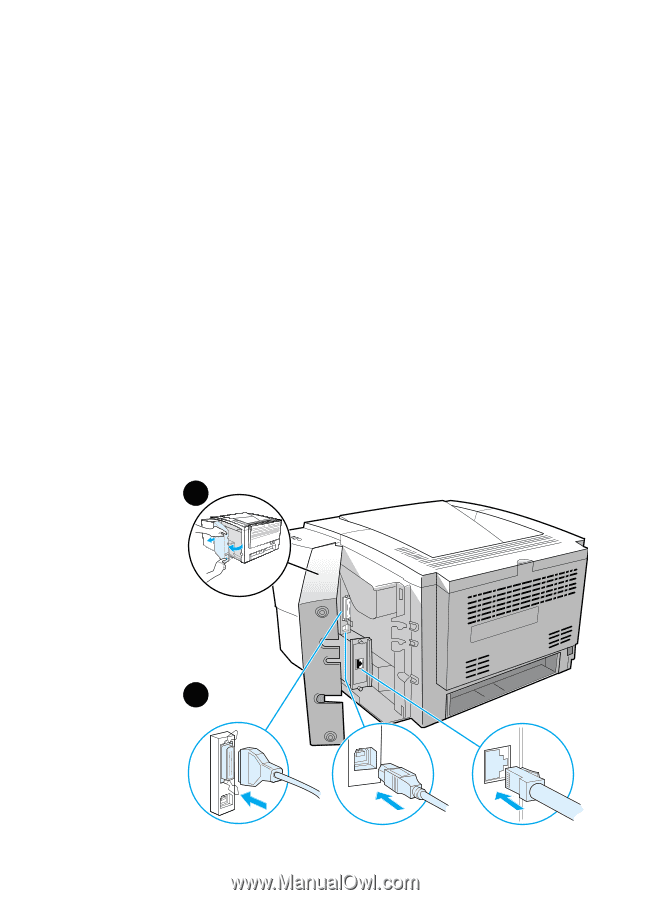
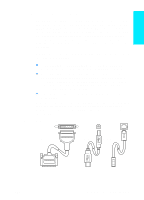
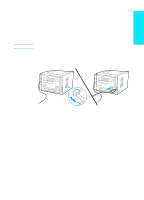
Figure 5 To connect your printer cable: 1 Locate the interface cable door, at the rear of the printer (see the figure below). Open the interface cable door by pressing on the release tabs and swinging the door to the side. 2 Connect the parallel, USB, or network cable to the correct port: • To connect a parallel cable to the parallel port, first turn off your computer (this is recommended, but not required). Snap the wire clips in place to secure the cable to the printer. The cable should install easily. If installation is difficult, check the cable orientation. Connect the other end of the cable to the proper connector on the computer. • To connect a USB cable to the USB port, connect the square end of the USB cable to the USB port on your printer. Connect the rectangular end of the USB cable to any available USB port on your computer. • To connect a network cable to an Ethernet 10/100 Base-TX network port, connect a twisted-pair network cable to the port on the HP Jetdirect EIO print server. Connect the other end of the cable to the network. 3 Close the interface cable door. Connect parallel, USB, or network cable 1 press the release tabs 2 Parallel Cable Network Cable USB Cable 10 ENWW
-
 1
1 -
2
-
3
-
4
-
5
-
6
-
7
-
8
-
 9
9 -
 10
10 -
 11
11 -
 12
12 -
 13
13 -
 14
14 -
 15
15 -
 16
16 -
 17
17 -
 18
18 -
 19
19 -
20
-
21
-
22
-
23
-
24
-
25
-
26
-
27
-
28
-
29
-
30
-
31
-
32
-
33
-
34
-
35
-
36
-
37
-
38
-
39
-
40
-
41
-
42
-
43
-
44
-
45
-
46
-
47
-
48
-
49
-
50
-
51
-
52
-
53
-
54
-
55
-
56
-
57
-
58
-
59
-
60
-
61
-
62
-
63
-
64
-
65
-
66
-
67
-
68
-
69
-
70
-
71
-
72
-
73
-
74
-
75
-
76
-
77
-
78
-
79
-
80
-
81
-
82
-
83
-
84
-
85
-
86
-
87
-
88
 |
 |