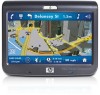
HP 310 HP iPAQ 300 Series Travel Companion - Product Guide - Page 22
Learn the basics, Brightness, Route progress, GPS Data, Phone, Dialer, Music player
 |
UPC - 883585309559
View all HP 310 manuals
Add to My Manuals
Save this manual to your list of manuals |
Page 22 highlights
Unlock 14 Chapter 7 Learn the basics Displays the current master volume level. The more number of arcs, the louder is the sound. The crossed out speaker icon indicates that the sound output is mute. Opens the Brightness setting slider below the icon to set the new backlight level. Tap the screen at the desired backlight level, or use the wheel to adjust it. This icon is displayed only when you tap the speaker icon, or press the multifunction wheel twice. Opens the Route progress list. When displayed on the Main menu screen, tap this icon to exit navigation, and return to the Multimedia application. When displayed on list screens, tap this icon to delete the item it is displayed next to. Opens a new screen where you can edit the item it is displayed next to. Opens the GPS Data screen. Displays the current GPS reception quality status. The more vertical lines, the better is the reception. A cross means there is no GPS reception. Locks the touch screen against accidental tapping. The hardware buttons can be operated even if the screen is locked. Reactivates the touch screen. Returns to the Main menu screen. Opens the Map screen. Displayed on the top left corner, this button opens the Phone Dialer application. On Points of interest (POI) detail screens, tapping the button calls the number saved with the POI. Exits navigation, and opens the Music player application. Returns to the previous screen. On screens with editable screen content, this icon saves the changes and exits the screen. On such screens, the screen without saving. icon returns to the previous On screens with non-editable point information, this icon leads to the Map screen with the selected point in the middle.
-
 1
1 -
2
-
3
-
4
-
5
-
6
-
7
-
8
-
9
-
10
-
11
-
12
-
13
-
14
-
15
-
16
-
 17
17 -
 18
18 -
 19
19 -
 20
20 -
 21
21 -
 22
22 -
 23
23 -
 24
24 -
 25
25 -
 26
26 -
 27
27 -
28
-
29
-
30
-
31
-
32
-
33
-
34
-
35
-
36
-
37
-
38
-
39
-
40
-
41
-
42
-
43
-
44
-
45
-
46
-
47
-
48
-
49
-
50
-
51
-
52
-
53
-
54
-
55
-
56
-
57
-
58
-
59
-
60
-
61
-
62
-
63
-
64
-
65
-
66
-
67
-
68
-
69
-
70
-
71
-
72
-
73
-
74
-
75
-
76
-
77
-
78
-
79
-
80
-
81
-
82
-
83
-
84
-
85
-
86
-
87
 |
 |
