HP 310 HP iPAQ 300 Series Travel Companion - Product Guide - Page 40
Create a route with a different start point, Cursor, Add Via, Continue, Go to, Set as Start
 |
UPC - 883585309559
View all HP 310 manuals
Add to My Manuals
Save this manual to your list of manuals |
Page 40 highlights
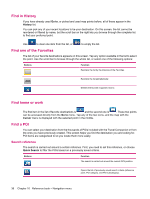
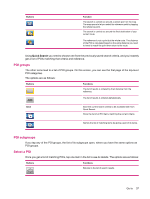
3. When the map is displayed with the Cursor menu, you can extend your previous route: ● Tap Add Via insert this new point before the final destination; or ● Tap Continue to append it as a new final destination after the original destination. 4. The route is automatically recalculated, and navigation continues. 5. Repeat the above steps to add more route points if necessary, then start driving. Create a route with a different start point If you wish to create a future route or to change the starting point to a different location, there are two different ways to do this. To create a route with a different start point keeping the same destination: 1. If you are not on the Main menu screen, tap to return to the main menu. 2. Tap Go to, and select the start point just like you did before with destinations. 3. When the map is displayed with the Cursor menu, tap Set as Start. 4. The Travel Companion asks you to confirm that the route does not start from the current GPS position. 5. If you confirm, the new starting point is set, and automatic route recalculation is disabled (otherwise the Travel Companion would recalculate the route from the current GPS position as soon as a new position data is received). 6. The new route has the same destination and Via points as the previous one. Alternatively, you can also create a route with a different starting point and a new destination: 1. If you are not on the Main menu screen, tap to return to the main menu. 2. Tap Go to, and select start point. 3. When the map appears with the Cursor menu, tap Set as Start. 4. The Travel Companion asks you to confirm that navigation does not start from the current GPS position. 5. If you confirm, the new starting point is set, and automatic route recalculation is disabled (otherwise the Travel Companion would recalculate the route from the current GPS position as soon as a new position data is received). 6. Tap to return to the Main menu screen. 7. Tap Go to, and select the destination. 8. When the map is displayed with the Cursor menu, tap Set as Destination. 9. A new route is calculated with the desired end point. 32 Chapter 9 Operating navigation
-
 1
1 -
2
-
3
-
4
-
5
-
6
-
7
-
8
-
9
-
10
-
11
-
12
-
13
-
14
-
15
-
16
-
17
-
18
-
19
-
20
-
21
-
22
-
23
-
24
-
25
-
26
-
27
-
28
-
29
-
30
-
31
-
32
-
33
-
34
-
 35
35 -
 36
36 -
 37
37 -
 38
38 -
 39
39 -
 40
40 -
 41
41 -
 42
42 -
 43
43 -
 44
44 -
 45
45 -
46
-
47
-
48
-
49
-
50
-
51
-
52
-
53
-
54
-
55
-
56
-
57
-
58
-
59
-
60
-
61
-
62
-
63
-
64
-
65
-
66
-
67
-
68
-
69
-
70
-
71
-
72
-
73
-
74
-
75
-
76
-
77
-
78
-
79
-
80
-
81
-
82
-
83
-
84
-
85
-
86
-
87
 |
 |
