HP 3330mfp HP LaserJet 3300mfp Series - (English) Getting Started Guide - Page 16
To connect a printer cable to your product, left side panel.
 |
UPC - 088698451328
View all HP 3330mfp manuals
Add to My Manuals
Save this manual to your list of manuals |
Page 16 highlights
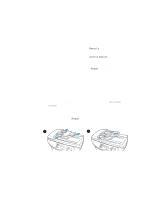
1 2 3 1 4 To connect a printer cable to your product To connect a printer cable to your product, use the following steps: Note If you want to use your HP LaserJet 3300 product as a stand-alone copier or fax machine-without connecting it to a computer-skip this section and see "To install a print cartridge" on page 13. Note Windows 95 and Windows NT 4.0 do not support USB cable connections with the printer. Macintosh computers do not support parallel cable connections. 1 Open the print cartridge door by pulling the sides of the door forward as shown. 2 Open the product's left side panel by 2 pressing the release latch. 3 Plug one end of the USB (1) or parallel cable (2) into the correct socket inside the left side panel as shown. 4 Thread the cable through the left side panel opening as shown, and close the left side panel. Note If you are using a USB cable, it should be threaded through the upper notch in the left side panel. If you are using a parallel cable, it should be threaded through the lower notch. After you have connected the printer cable, leave the print cartridge door open and proceed to "To install a print cartridge" on page 13. You will connect the printer cable to your computer later in the setup process. 12 2 Setting up your product ENWW
-
 1
1 -
2
-
3
-
4
-
5
-
6
-
7
-
8
-
9
-
10
-
 11
11 -
 12
12 -
 13
13 -
 14
14 -
 15
15 -
 16
16 -
 17
17 -
 18
18 -
 19
19 -
 20
20 -
 21
21 -
22
-
23
-
24
-
25
-
26
-
27
-
28
-
29
-
30
-
31
-
32
-
33
-
34
-
35
-
36
-
37
-
38
 |
 |
