HP 3800 HP Embedded Web Server - User Guide - Page 41
Alerts, supplies status messages on the control panel. This applies only
 |
UPC - 689466270464
View all HP 3800 manuals
Add to My Manuals
Save this manual to your list of manuals |
Page 41 highlights
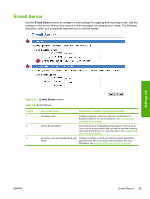
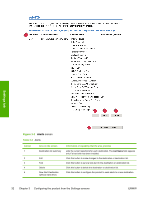
Alerts From the Alerts screen, IT administrators can set up the product to send problem and status alerts to anyone through e-mail messages. When this function is configured, alerts are automatically triggered about supplies, paper-path status, and other service and advisory information. More than one individual can receive alerts, with each person receiving only specific alerts. For example, an administrative assistant might be responsible for ordering print cartridges or fixing jams, and could receive advanced warning when toner is low or a jam occurs. Similarly, the long-life supplies might be handled by an external service provider, who could receive alerts about performing product maintenance, loading the front or rear stapler, and similar needs. With a permanent storage device installed, such as a hard disk, a user can create up to four different destination lists, with up to 20 recipients on each list. (Without the permanent storage device, a user can send alerts to only four e-mail addresses.) By selecting the Remove Control Panel Supplies Status Messages option (available on the Alerts setup screen that appears when you press the New Destination List button), you can suppress the Supplies Low or Supplies Out supplies status messages on the control panel. (This applies only to the black print cartridge.) The message is suppressed at the control panel only if one or both of these alerts has first been selected to be received. The following illustration, table, and procedures describe how to use this screen to edit, test, and delete destinations and destination lists. NOTE In order for alerts to function, outgoing e-mail must be enabled. To enable outgoing mail, see Configuring outgoing e-mail. Settings tab ENWW Alerts 31
-
 1
1 -
2
-
3
-
4
-
5
-
6
-
7
-
8
-
9
-
10
-
11
-
12
-
13
-
14
-
15
-
16
-
17
-
18
-
19
-
20
-
21
-
22
-
23
-
24
-
25
-
26
-
27
-
28
-
29
-
30
-
31
-
32
-
33
-
34
-
35
-
 36
36 -
 37
37 -
 38
38 -
 39
39 -
 40
40 -
 41
41 -
 42
42 -
 43
43 -
 44
44 -
 45
45 -
 46
46 -
47
-
48
-
49
-
50
-
51
-
52
-
53
-
54
-
55
-
56
-
57
-
58
-
59
-
60
-
61
-
62
-
63
-
64
-
65
-
66
-
67
-
68
-
69
-
70
-
71
-
72
-
73
-
74
 |
 |
