HP 4020 HP Designjet 4020 and 4520 Printer Series - User's Guide: English - Page 135
How do I... (paper advance calibration topics), Overview of the calibration process, Paper advance
 |
UPC - 884420909606
View all HP 4020 manuals
Add to My Manuals
Save this manual to your list of manuals |
Page 135 highlights
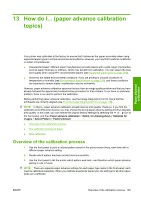
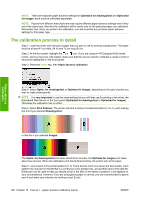
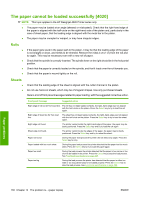
13 How do I... (paper advance calibration topics) Paper advance calibration Your printer was calibrated at the factory to ensure that it advances the paper accurately when using supported paper types in normal environmental conditions. However, you may find it useful to recalibrate in certain circumstances: ● Unsupported paper: different paper manufacturers provide papers with a wide range of properties such as paper thickness or stiffness, which may benefit from calibration. You can expect the best print quality when using HP's recommended papers (see Supported paper types on page 200). ● Abnormal but stable environmental conditions: if you are printing in unusual conditions of temperature or humidity (see Environmental specifications on page 210), and those conditions are expected to remain stable, recalibration may be worthwhile. However, paper advance calibration assumes that you have an image quality problem and that you have already followed the appropriate troubleshooting procedure for that problem. If you have no particular problem, there is no need to perform the calibration. Before performing paper advance calibration, use the Image Diagnostics Print to check that the printheads are correctly aligned (see Print the Image Diagnostics Print on page 118). NOTE: In theory, paper advance calibration should improve print quality. However, if you find the calibration print difficult to interpret, you may choose the wrong paper advance setting and thus degrade print quality. In this case, you can restore the original factory settings by selecting the or icon at the front panel, and then Paper advance calibration > Optim. for drawings/text or Optimize for images > Select Pattern > Factory Default. ● Overview of the calibration process ● The calibration process in detail ● After calibration Overview of the calibration process 1. Use the front panel to print a colored pattern stored in the printer seven times, each time with a different paper advance setting. 2. Decide which pattern has been printed most successfully. 3. Use the front panel to tell the printer which pattern was best-and therefore which paper advance setting to use in future. NOTE: There are separate paper advance settings for each paper type name in the front panel: each must be calibrated separately. When you calibrate a particular paper type, the settings for all other paper types are unaffected. ENWW Overview of the calibration process 125
-
 1
1 -
2
-
3
-
4
-
5
-
6
-
7
-
8
-
9
-
10
-
11
-
12
-
13
-
14
-
15
-
16
-
17
-
18
-
19
-
20
-
21
-
22
-
23
-
24
-
25
-
26
-
27
-
28
-
29
-
30
-
31
-
32
-
33
-
34
-
35
-
36
-
37
-
38
-
39
-
40
-
41
-
42
-
43
-
44
-
45
-
46
-
47
-
48
-
49
-
50
-
51
-
52
-
53
-
54
-
55
-
56
-
57
-
58
-
59
-
60
-
61
-
62
-
63
-
64
-
65
-
66
-
67
-
68
-
69
-
70
-
71
-
72
-
73
-
74
-
75
-
76
-
77
-
78
-
79
-
80
-
81
-
82
-
83
-
84
-
85
-
86
-
87
-
88
-
89
-
90
-
91
-
92
-
93
-
94
-
95
-
96
-
97
-
98
-
99
-
100
-
101
-
102
-
103
-
104
-
105
-
106
-
107
-
108
-
109
-
110
-
111
-
112
-
113
-
114
-
115
-
116
-
117
-
118
-
119
-
120
-
121
-
122
-
123
-
124
-
125
-
126
-
127
-
128
-
129
-
 130
130 -
 131
131 -
 132
132 -
 133
133 -
 134
134 -
 135
135 -
 136
136 -
 137
137 -
 138
138 -
 139
139 -
 140
140 -
141
-
142
-
143
-
144
-
145
-
146
-
147
-
148
-
149
-
150
-
151
-
152
-
153
-
154
-
155
-
156
-
157
-
158
-
159
-
160
-
161
-
162
-
163
-
164
-
165
-
166
-
167
-
168
-
169
-
170
-
171
-
172
-
173
-
174
-
175
-
176
-
177
-
178
-
179
-
180
-
181
-
182
-
183
-
184
-
185
-
186
-
187
-
188
-
189
-
190
-
191
-
192
-
193
-
194
-
195
-
196
-
197
-
198
-
199
-
200
-
201
-
202
-
203
-
204
-
205
-
206
-
207
-
208
-
209
-
210
-
211
-
212
-
213
-
214
-
215
-
216
-
217
-
218
-
219
-
220
-
221
-
222
-
223
-
224
-
225
-
226
-
227
-
228
-
229
-
230
-
231
-
232
-
233
-
234
-
235
 |
 |