HP 8530p HP EliteBook 8530p Notebook PC and HP EliteBook 8530w Mobile Workstat - Page 95
Graphics card, Lift the processor
 |
UPC - 884962209325
View all HP 8530p manuals
Add to My Manuals
Save this manual to your list of manuals |
Page 95 highlights
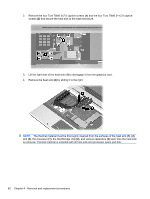
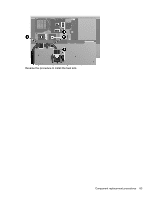
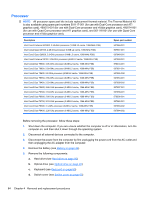
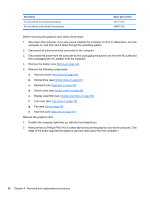
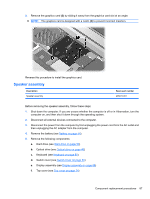
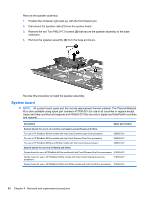
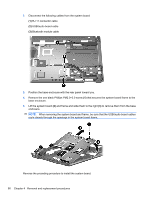
e. Display assembly (see Display assembly on page 68) f. Top cover (see Top cover on page 74) g. Fan (see Fan on page 79) h. Heat sink (see Heat sink on page 81) Remove the processor: 1. Position the computer right-side up, with the front toward you. 2. Use a flat-bladed screwdriver to turn the processor locking screw (1) one-half turn counterclockwise until you hear a click. 3. Lift the processor (2) straight up and remove it. NOTE: The gold triangle (3) on the processor must be aligned with the triangle (4) embossed on the processor slot when you install the processor. Reverse this procedure to install the processor. Graphics card NOTE: All graphics card spare part kits include replacement thermal material. Description Spare part number ATI M86M ATI Mobility Radeon HD 3650 graphics card with 256 MB of graphics subsystem memory 495081-001 (supports Hypermemory) ATI M86M ATI Mobility FireGL V700 graphics card with 256 MB of graphics subsystem memory (supports Hypermemory) 502337-001 nVidia NB9P-GLM2 graphics card with 512 MB of graphics subsystem memory (supports Quadro 502338-001 FX 770M) Thermal Material Kits For use with the ATI Quad Core processor For use with the nVidia Quad Core processor 495074-001 501116-001 Component replacement procedures 85
-
 1
1 -
2
-
3
-
4
-
5
-
6
-
7
-
8
-
9
-
10
-
11
-
12
-
13
-
14
-
15
-
16
-
17
-
18
-
19
-
20
-
21
-
22
-
23
-
24
-
25
-
26
-
27
-
28
-
29
-
30
-
31
-
32
-
33
-
34
-
35
-
36
-
37
-
38
-
39
-
40
-
41
-
42
-
43
-
44
-
45
-
46
-
47
-
48
-
49
-
50
-
51
-
52
-
53
-
54
-
55
-
56
-
57
-
58
-
59
-
60
-
61
-
62
-
63
-
64
-
65
-
66
-
67
-
68
-
69
-
70
-
71
-
72
-
73
-
74
-
75
-
76
-
77
-
78
-
79
-
80
-
81
-
82
-
83
-
84
-
85
-
86
-
87
-
88
-
89
-
 90
90 -
 91
91 -
 92
92 -
 93
93 -
 94
94 -
 95
95 -
 96
96 -
 97
97 -
 98
98 -
 99
99 -
 100
100 -
101
-
102
-
103
-
104
-
105
-
106
-
107
-
108
-
109
-
110
-
111
-
112
-
113
-
114
-
115
-
116
-
117
-
118
-
119
-
120
-
121
-
122
-
123
-
124
-
125
-
126
-
127
-
128
-
129
-
130
-
131
-
132
-
133
-
134
-
135
-
136
-
137
-
138
-
139
-
140
-
141
-
142
-
143
-
144
-
145
-
146
-
147
-
148
-
149
-
150
-
151
-
152
-
153
-
154
-
155
-
156
-
157
-
158
-
159
-
160
-
161
-
162
-
163
-
164
-
165
-
166
-
167
-
168
-
169
-
170
 |
 |
