HP A7533A HP StorageWorks Fabric OS 6.x administrator guide (5697-0015, May 20 - Page 74
Programs > Administrative Tools > Local Security
 |
UPC - 829160830858
View all HP A7533A manuals
Add to My Manuals
Save this manual to your list of manuals |
Page 74 highlights
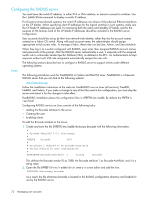
Each user group should be associated with a specific switch login role. For example, you should configure a user group for root, admin, factory, switchadmin, and user, and then add any users whose logins you want to associate to the appropriate group. • Configuring the server To enable CHAP: 1. From the Windows Start menu, select Programs > Administrative Tools > Local Security Policy to open the Local Security Settings window. 2. In the Local Security Settings window, expand the Account Policies folder and select the Password Policy folder. 3. From the list of policies in the Password Policy folder, right-click Store password using reversible encryption for all users in the domain, and select Security from the pop-up menu. 4. An additional Local Security Settings window appears. Click the Enabled radio button and then click OK. To configure users: 1. From the Windows Start menu, select Programs > Administrative Tools > Computer Management to open the Computer Management window. 2. In the Computer Management window, expand the Local Users and Groups folder and select the Groups folder. 3. Right-click the Groups folder and select New Group from the pop-up menu. 4. In the New Group window, provide a Name and Description for the group and click Add. 5. In the Select Users or Groups window, select the user (who should already have been configured) you want to add to the group and click Add. 6. Repeat this for every user you want to add. When you have completed adding all users, click OK. 7. In the New Group window, verify the users you added in step 4 appear in the Members field; then click Create to create this group. The new groups are created for each login type (admin, switchAdmin, user). To configure the RADIUS server: 1. From the Windows Start menu, select Programs > Administrative Tools > Internet Authentication Service to open the Internet Authentication Service window. 2. In the Internet Authentication Service window, right-click the Clients folder and select New Client from the pop-up menu. A client is the device that uses the RADIUS server; in this case, it is the switch. 3. In the Add Client window, provide the following: Friendly name-The friendly name should be an alias that is easily recognizable as the switch to which you are connecting. Protocol-Select RADIUS as the protocol. 4. In the Add RADIUS Client window, provide the following: Client address (IP or DNS)-Enter the IP address of the switch. Client-Vendor-Select RADIUS Standard. Shared secret-Provide a password. Shared secret is a password used between the client device and server to prevent IP address spoofing by unwanted clients. Keep your shared secret password in a safe place. You will need to enter this password in the switch configuration. After clicking Finish, repeat step 2 through step 4 for all switches on which RADIUS authentication will be used. 5. In the Internet Authentication Service window, right-click the Remote Access Policies folder; then select New Remote Access Policy from the pop-up window. A remote access policy must be created for each login role (Root, Admin, Factory, SwitchAdmin, and User) for which you want to use RADIUS. Apply this policy to the user groups that you already created. 74 Managing user accounts
-
 1
1 -
2
-
3
-
4
-
5
-
6
-
7
-
8
-
9
-
10
-
11
-
12
-
13
-
14
-
15
-
16
-
17
-
18
-
19
-
20
-
21
-
22
-
23
-
24
-
25
-
26
-
27
-
28
-
29
-
30
-
31
-
32
-
33
-
34
-
35
-
36
-
37
-
38
-
39
-
40
-
41
-
42
-
43
-
44
-
45
-
46
-
47
-
48
-
49
-
50
-
51
-
52
-
53
-
54
-
55
-
56
-
57
-
58
-
59
-
60
-
61
-
62
-
63
-
64
-
65
-
66
-
67
-
68
-
 69
69 -
 70
70 -
 71
71 -
 72
72 -
 73
73 -
 74
74 -
 75
75 -
 76
76 -
 77
77 -
 78
78 -
 79
79 -
80
-
81
-
82
-
83
-
84
-
85
-
86
-
87
-
88
-
89
-
90
-
91
-
92
-
93
-
94
-
95
-
96
-
97
-
98
-
99
-
100
-
101
-
102
-
103
-
104
-
105
-
106
-
107
-
108
-
109
-
110
-
111
-
112
-
113
-
114
-
115
-
116
-
117
-
118
-
119
-
120
-
121
-
122
-
123
-
124
-
125
-
126
-
127
-
128
-
129
-
130
-
131
-
132
-
133
-
134
-
135
-
136
-
137
-
138
-
139
-
140
-
141
-
142
-
143
-
144
-
145
-
146
-
147
-
148
-
149
-
150
-
151
-
152
-
153
-
154
-
155
-
156
-
157
-
158
-
159
-
160
-
161
-
162
-
163
-
164
-
165
-
166
-
167
-
168
-
169
-
170
-
171
-
172
-
173
-
174
-
175
-
176
-
177
-
178
-
179
-
180
-
181
-
182
-
183
-
184
-
185
-
186
-
187
-
188
-
189
-
190
-
191
-
192
-
193
-
194
-
195
-
196
-
197
-
198
-
199
-
200
-
201
-
202
-
203
-
204
-
205
-
206
-
207
-
208
-
209
-
210
-
211
-
212
-
213
-
214
-
215
-
216
-
217
-
218
-
219
-
220
-
221
-
222
-
223
-
224
-
225
-
226
-
227
-
228
-
229
-
230
-
231
-
232
-
233
-
234
-
235
-
236
-
237
-
238
-
239
-
240
-
241
-
242
-
243
-
244
-
245
-
246
-
247
-
248
-
249
-
250
-
251
-
252
-
253
-
254
-
255
-
256
-
257
-
258
-
259
-
260
-
261
-
262
-
263
-
264
-
265
-
266
-
267
-
268
-
269
-
270
-
271
-
272
-
273
-
274
-
275
-
276
-
277
-
278
-
279
-
280
-
281
-
282
-
283
-
284
-
285
-
286
-
287
-
288
-
289
-
290
-
291
-
292
-
293
-
294
-
295
-
296
-
297
-
298
-
299
-
300
-
301
-
302
-
303
-
304
-
305
-
306
-
307
-
308
-
309
-
310
-
311
-
312
-
313
-
314
-
315
-
316
-
317
-
318
-
319
-
320
-
321
-
322
-
323
-
324
-
325
-
326
-
327
-
328
-
329
-
330
-
331
-
332
-
333
-
334
-
335
-
336
-
337
-
338
-
339
-
340
-
341
-
342
-
343
-
344
-
345
-
346
-
347
-
348
-
349
-
350
-
351
-
352
-
353
-
354
-
355
-
356
-
357
-
358
-
359
-
360
-
361
-
362
-
363
-
364
-
365
-
366
-
367
-
368
-
369
-
370
-
371
-
372
-
373
-
374
-
375
-
376
-
377
-
378
-
379
-
380
-
381
-
382
-
383
-
384
-
385
-
386
-
387
-
388
-
389
-
390
-
391
-
392
-
393
-
394
-
395
-
396
-
397
-
398
-
399
-
400
-
401
-
402
-
403
-
404
-
405
-
406
-
407
-
408
-
409
-
410
-
411
-
412
-
413
-
414
-
415
-
416
-
417
-
418
-
419
-
420
-
421
-
422
-
423
-
424
-
425
-
426
-
427
-
428
-
429
-
430
-
431
-
432
-
433
-
434
-
435
-
436
-
437
-
438
-
439
-
440
-
441
-
442
-
443
-
444
-
445
-
446
-
447
-
448
-
449
-
450
-
451
-
452
-
453
-
454
-
455
-
456
-
457
-
458
-
459
-
460
-
461
-
462
-
463
-
464
-
465
-
466
-
467
-
468
-
469
-
470
-
471
-
472
-
473
-
474
-
475
-
476
-
477
-
478
-
479
-
480
-
481
-
482
-
483
-
484
-
485
-
486
-
487
-
488
-
489
-
490
-
491
-
492
-
493
-
494
-
495
-
496
-
497
-
498
-
499
-
500
-
501
-
502
-
503
-
504
-
505
-
506
-
507
-
508
-
509
-
510
-
511
-
512
-
513
-
514
-
515
-
516
-
517
-
518
 |
 |
