HP Color LaserJet 9500 HP Color LaserJet 9500nand 9500hdn - User Guide - Page 108
Jam in tray 2 or tray 3, Remove any jammed media from this area. Make sure that you
 |
View all HP Color LaserJet 9500 manuals
Add to My Manuals
Save this manual to your list of manuals |
Page 108 highlights
http://www.hp.com/support/lj9500 1 3 4 Jam in tray 2 or tray 3 Follow these directions to clear jams in tray 2 or tray 3. 1 Open the tray until it stops. If you hear the sound of media tearing, stop and look for the jammed media. Make sure to check the upper right side of the cavity behind the tray. To minimize tearing, remove the jammed media by pulling it to the left. 2 Remove any other jammed media from this area by pulling the media to the left. Make sure that you have removed all of the pieces of torn media. 3 Open the upper right door. 4 Remove any jammed media from this area. Make sure that you have removed all of the pieces of torn media. 5 Close the upper right door. 6 Close the tray. 106 Chapter 6 - Solving problems Rev. 1.0
-
 1
1 -
2
-
3
-
4
-
5
-
6
-
7
-
8
-
9
-
10
-
11
-
12
-
13
-
14
-
15
-
16
-
17
-
18
-
19
-
20
-
21
-
22
-
23
-
24
-
25
-
26
-
27
-
28
-
29
-
30
-
31
-
32
-
33
-
34
-
35
-
36
-
37
-
38
-
39
-
40
-
41
-
42
-
43
-
44
-
45
-
46
-
47
-
48
-
49
-
50
-
51
-
52
-
53
-
54
-
55
-
56
-
57
-
58
-
59
-
60
-
61
-
62
-
63
-
64
-
65
-
66
-
67
-
68
-
69
-
70
-
71
-
72
-
73
-
74
-
75
-
76
-
77
-
78
-
79
-
80
-
81
-
82
-
83
-
84
-
85
-
86
-
87
-
88
-
89
-
90
-
91
-
92
-
93
-
94
-
95
-
96
-
97
-
98
-
99
-
100
-
101
-
102
-
 103
103 -
 104
104 -
 105
105 -
 106
106 -
 107
107 -
 108
108 -
 109
109 -
 110
110 -
 111
111 -
 112
112 -
 113
113 -
114
-
115
-
116
-
117
-
118
-
119
-
120
-
121
-
122
-
123
-
124
-
125
-
126
-
127
-
128
-
129
-
130
-
131
-
132
-
133
-
134
-
135
-
136
-
137
-
138
-
139
-
140
-
141
-
142
-
143
-
144
-
145
-
146
-
147
-
148
-
149
-
150
-
151
-
152
-
153
-
154
-
155
-
156
-
157
-
158
-
159
-
160
-
161
-
162
-
163
-
164
-
165
-
166
-
167
-
168
-
169
-
170
-
171
-
172
-
173
-
174
-
175
-
176
-
177
-
178
-
179
-
180
-
181
-
182
-
183
-
184
-
185
-
186
-
187
-
188
-
189
-
190
-
191
-
192
-
193
-
194
-
195
-
196
-
197
-
198
-
199
-
200
-
201
-
202
-
203
-
204
-
205
-
206
-
207
-
208
-
209
-
210
-
211
-
212
-
213
-
214
-
215
-
216
-
217
-
218
-
219
-
220
-
221
-
222
-
223
-
224
-
225
-
226
-
227
-
228
-
229
-
230
-
231
-
232
-
233
-
234
-
235
-
236
-
237
-
238
-
239
-
240
-
241
-
242
-
243
-
244
-
245
-
246
-
247
-
248
-
249
-
250
-
251
-
252
-
253
-
254
 |
 |

106
Chapter 6 – Solving problems
Rev. 1.0
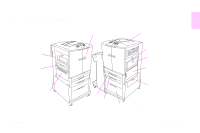
Jam in tray 2 or tray 3
Follow these directions to clear jams in tray 2 or tray 3.
1
Open the tray until it stops. If you hear the sound of media tearing, stop and
look for the jammed media. Make sure to check the upper right side of the
cavity behind the tray. To minimize tearing, remove the jammed media by
pulling it to the left.
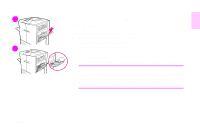
2
Remove any other jammed media from this area by pulling the media to the
left. Make sure that you have removed all of the pieces of torn media.
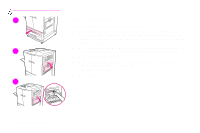
3
Open the upper right door.
4
Remove any jammed media from this area. Make sure that you have
removed all of the pieces of torn media.
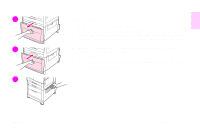
5
Close the upper right door.
6
Close the tray.
1
3
4