HP Color LaserJet 9500 HP Color LaserJet 9500nand 9500hdn - User Guide - Page 192
Move one hand to the front-center of the belt, and then slide the belt
 |
View all HP Color LaserJet 9500 manuals
Add to My Manuals
Save this manual to your list of manuals |
Page 192 highlights
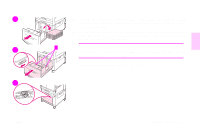
http://www.hp.com/support/lj9500 7 8 9 7 Remove the new belt from its packaging and save the packaging. Gently remove the wrapping from around the transfer belt. CAUTION Do not touch the shiny black surface of the new transfer belt. 8 Grasp both sides of the belt and align the blue arrows on the belt with the blue arrows inside the printer. Insert the belt halfway into the printer. 9 Move one hand to the front-center of the belt, and then slide the belt completely into the printer. Close the right door. Note If the right door does not close, make sure that the transfer belt is pushed completely into the printer. 190 Chapter 7 - Supplies Rev. 1.0
-
 1
1 -
2
-
3
-
4
-
5
-
6
-
7
-
8
-
9
-
10
-
11
-
12
-
13
-
14
-
15
-
16
-
17
-
18
-
19
-
20
-
21
-
22
-
23
-
24
-
25
-
26
-
27
-
28
-
29
-
30
-
31
-
32
-
33
-
34
-
35
-
36
-
37
-
38
-
39
-
40
-
41
-
42
-
43
-
44
-
45
-
46
-
47
-
48
-
49
-
50
-
51
-
52
-
53
-
54
-
55
-
56
-
57
-
58
-
59
-
60
-
61
-
62
-
63
-
64
-
65
-
66
-
67
-
68
-
69
-
70
-
71
-
72
-
73
-
74
-
75
-
76
-
77
-
78
-
79
-
80
-
81
-
82
-
83
-
84
-
85
-
86
-
87
-
88
-
89
-
90
-
91
-
92
-
93
-
94
-
95
-
96
-
97
-
98
-
99
-
100
-
101
-
102
-
103
-
104
-
105
-
106
-
107
-
108
-
109
-
110
-
111
-
112
-
113
-
114
-
115
-
116
-
117
-
118
-
119
-
120
-
121
-
122
-
123
-
124
-
125
-
126
-
127
-
128
-
129
-
130
-
131
-
132
-
133
-
134
-
135
-
136
-
137
-
138
-
139
-
140
-
141
-
142
-
143
-
144
-
145
-
146
-
147
-
148
-
149
-
150
-
151
-
152
-
153
-
154
-
155
-
156
-
157
-
158
-
159
-
160
-
161
-
162
-
163
-
164
-
165
-
166
-
167
-
168
-
169
-
170
-
171
-
172
-
173
-
174
-
175
-
176
-
177
-
178
-
179
-
180
-
181
-
182
-
183
-
184
-
185
-
186
-
 187
187 -
 188
188 -
 189
189 -
 190
190 -
 191
191 -
 192
192 -
 193
193 -
 194
194 -
 195
195 -
 196
196 -
 197
197 -
198
-
199
-
200
-
201
-
202
-
203
-
204
-
205
-
206
-
207
-
208
-
209
-
210
-
211
-
212
-
213
-
214
-
215
-
216
-
217
-
218
-
219
-
220
-
221
-
222
-
223
-
224
-
225
-
226
-
227
-
228
-
229
-
230
-
231
-
232
-
233
-
234
-
235
-
236
-
237
-
238
-
239
-
240
-
241
-
242
-
243
-
244
-
245
-
246
-
247
-
248
-
249
-
250
-
251
-
252
-
253
-
254
 |
 |

190
Chapter 7 – Supplies
Rev. 1.0
7
Remove the new belt from its packaging and save the packaging. Gently
remove the wrapping from around the transfer belt.
CAUTION
Do not touch the shiny black surface of the new transfer belt.
8
Grasp both sides of the belt and align the blue arrows on the belt with the
blue arrows inside the printer. Insert the belt halfway into the printer.
9
Move one hand to the front-center of the belt, and then slide the belt
completely into the printer. Close the right door.
Note
If the right door does not close, make sure that the transfer belt is pushed
completely into the printer.
7
8
9