HP Color LaserJet 9500 HP Color LaserJet 9500nand 9500hdn - User Guide - Page 193
underside of the belt as you insert the roller into the printer.
 |
View all HP Color LaserJet 9500 manuals
Add to My Manuals
Save this manual to your list of manuals |
Page 193 highlights
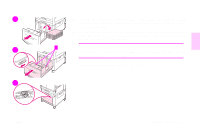
10 11 12 ENWW 10 On the front side of the printer, locate the blue transfer-roller handle beneath the large green lever. Grasp the handle and pull the used roller out of the printer. 11 Unpack the new roller and set it on a clean, flat surface. Carefully remove the protective sheet. 7 CAUTION Do not touch the black foam roller, and take care not to scratch the underside of the belt as you insert the roller into the printer. 12 Using one hand to support the underside of the roller, turn the roller to a 45-degree angle and align the roller with the slot. Slide the roller into the slot until it stops completely. Installing supplies 191
-
 1
1 -
2
-
3
-
4
-
5
-
6
-
7
-
8
-
9
-
10
-
11
-
12
-
13
-
14
-
15
-
16
-
17
-
18
-
19
-
20
-
21
-
22
-
23
-
24
-
25
-
26
-
27
-
28
-
29
-
30
-
31
-
32
-
33
-
34
-
35
-
36
-
37
-
38
-
39
-
40
-
41
-
42
-
43
-
44
-
45
-
46
-
47
-
48
-
49
-
50
-
51
-
52
-
53
-
54
-
55
-
56
-
57
-
58
-
59
-
60
-
61
-
62
-
63
-
64
-
65
-
66
-
67
-
68
-
69
-
70
-
71
-
72
-
73
-
74
-
75
-
76
-
77
-
78
-
79
-
80
-
81
-
82
-
83
-
84
-
85
-
86
-
87
-
88
-
89
-
90
-
91
-
92
-
93
-
94
-
95
-
96
-
97
-
98
-
99
-
100
-
101
-
102
-
103
-
104
-
105
-
106
-
107
-
108
-
109
-
110
-
111
-
112
-
113
-
114
-
115
-
116
-
117
-
118
-
119
-
120
-
121
-
122
-
123
-
124
-
125
-
126
-
127
-
128
-
129
-
130
-
131
-
132
-
133
-
134
-
135
-
136
-
137
-
138
-
139
-
140
-
141
-
142
-
143
-
144
-
145
-
146
-
147
-
148
-
149
-
150
-
151
-
152
-
153
-
154
-
155
-
156
-
157
-
158
-
159
-
160
-
161
-
162
-
163
-
164
-
165
-
166
-
167
-
168
-
169
-
170
-
171
-
172
-
173
-
174
-
175
-
176
-
177
-
178
-
179
-
180
-
181
-
182
-
183
-
184
-
185
-
186
-
187
-
 188
188 -
 189
189 -
 190
190 -
 191
191 -
 192
192 -
 193
193 -
 194
194 -
 195
195 -
 196
196 -
 197
197 -
 198
198 -
199
-
200
-
201
-
202
-
203
-
204
-
205
-
206
-
207
-
208
-
209
-
210
-
211
-
212
-
213
-
214
-
215
-
216
-
217
-
218
-
219
-
220
-
221
-
222
-
223
-
224
-
225
-
226
-
227
-
228
-
229
-
230
-
231
-
232
-
233
-
234
-
235
-
236
-
237
-
238
-
239
-
240
-
241
-
242
-
243
-
244
-
245
-
246
-
247
-
248
-
249
-
250
-
251
-
252
-
253
-
254
 |
 |

ENWW
Installing supplies
191
7
10
On the front side of the printer, locate the blue transfer-roller handle
beneath the large green lever. Grasp the handle and pull the used roller out
of the printer.
11
Unpack the new roller and set it on a clean, flat surface. Carefully remove
the protective sheet.
CAUTION
Do not touch the black foam roller, and take care not to scratch the
underside of the belt as you insert the roller into the printer.
12
Using one hand to support the underside of the roller, turn the roller to a
45-degree angle and align the roller with the slot. Slide the roller into the slot
until it stops completely.
10
11
12