HP D2460 User Guide - Page 26
HP Real Life Technologies photo fix, Photo print cartridge - free installer download
 |
UPC - 808736786652
View all HP D2460 manuals
Add to My Manuals
Save this manual to your list of manuals |
Page 26 highlights
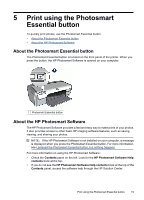
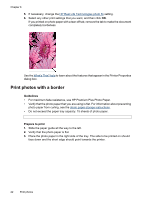
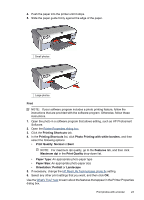
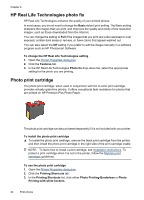
Chapter 6 HP Real Life Technologies photo fix HP Real Life Technologies enhance the quality of your printed photos. In most cases, you do not need to change the Basic default print setting. The Basic setting sharpens the images that you print, and improves the quality and clarity of low resolution images, such as those downloaded from the Internet. You can change the setting to Full if the images that you print are under exposed or over exposed, contain dark areas or red eye, or have colors that appear washed out. You can also select the Off setting if you prefer to edit the image manually in a software program such as HP Photosmart Software. To change the HP Real Life Technologies setting 1. Open the Printer Properties dialog box. 2. Click the Features tab. 3. In the HP Real Life Technologies Photo fix drop-down list, select the appropriate setting for the photo you are printing. Photo print cartridge The photo print cartridge, when used in conjunction with the tri-color print cartridge, provides virtually grain-free photos. It offers exceptional fade resistance for photos that are printed on HP Premium Plus Photo Paper. The photo print cartridge can be purchased separately if it is not included with your printer. To install the photo print cartridge ▲ To install the photo print cartridge, remove the black print cartridge from the printer, and then install the photo print cartridge in the right side of the print cartridge cradle. NOTE: To learn how to install a print cartridge, see Installation instructions. To protect a print cartridge when it is not in the printer, follow the Maintain print cartridges guidelines. To use the photo print cartridge 1. Open the Printer Properties dialog box. 2. Click the Printing Shortcuts tab. 3. In the Printing Shortcuts list, click either Photo Printing-Borderless or Photo Printing-with white borders. 24 Print photos
-
 1
1 -
2
-
3
-
4
-
5
-
6
-
7
-
8
-
9
-
10
-
11
-
12
-
13
-
14
-
15
-
16
-
17
-
18
-
19
-
20
-
 21
21 -
 22
22 -
 23
23 -
 24
24 -
 25
25 -
 26
26 -
 27
27 -
 28
28 -
 29
29 -
 30
30 -
 31
31 -
32
-
33
-
34
-
35
-
36
-
37
-
38
-
39
-
40
-
41
-
42
-
43
-
44
-
45
-
46
-
47
-
48
-
49
-
50
-
51
-
52
-
53
-
54
-
55
-
56
-
57
-
58
-
59
-
60
-
61
-
62
-
63
-
64
-
65
-
66
-
67
-
68
-
69
-
70
-
71
-
72
-
73
-
74
-
75
-
76
-
77
-
78
-
79
-
80
-
81
-
82
-
83
-
84
-
85
-
86
-
87
-
88
-
89
-
90
-
91
-
92
-
93
-
94
-
95
-
96
-
97
-
98
 |
 |