HP D330 HP Compaq Business Desktops d330 Desktop Model - (English) Hardware Re - Page 33
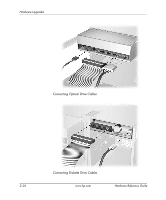
from the drive to the embedded audio connector on the system
 |
View all HP D330 manuals
Add to My Manuals
Save this manual to your list of manuals |
Page 33 highlights
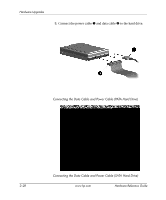
Hardware Upgrades 6. Install the drive by sliding it into the appropriate drive bay on the front of the chassis. The drivelock automatically secures the drive in the bay. Installing Optical and Diskette Drives into the Drive Bays Ä CAUTION: Make sure the guide screws line up with the guide slots in the drive cage. The use of unnecessary force when installing any drive into the drive bay may result in damage to the drive. 7. When installing an optical drive, the default audio solution is digital audio. If analog audio is preferred, connect the audio cable from the drive to the embedded audio connector on the system board. 8. Connect the data and power cables on the back of the drives. Hardware Reference Guide www.hp.com 2-23
-
 1
1 -
2
-
3
-
4
-
5
-
6
-
7
-
8
-
9
-
10
-
11
-
12
-
13
-
14
-
15
-
16
-
17
-
18
-
19
-
20
-
21
-
22
-
23
-
24
-
25
-
26
-
27
-
 28
28 -
 29
29 -
 30
30 -
 31
31 -
 32
32 -
 33
33 -
 34
34 -
 35
35 -
 36
36 -
 37
37 -
 38
38 -
39
-
40
-
41
-
42
-
43
-
44
-
45
-
46
-
47
-
48
-
49
-
50
-
51
-
52
-
53
-
54
-
55
-
56
-
57
-
58
-
59
-
60
-
61
-
62
-
63
-
64
-
65
-
66
 |
 |

Hardware Reference Guide
www.hp.com
2–23
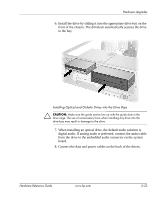
Hardware Upgrades
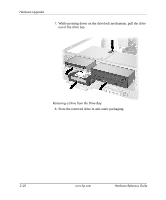
6. Install the drive by sliding it into the appropriate drive bay on the
front of the chassis. The drivelock automatically secures the drive
in the bay.
Installing Optical and Diskette Drives into the Drive Bays
Ä
CAUTION:
Make sure the guide screws line up with the guide slots in the
drive cage. The use of unnecessary force when installing any drive into the
drive bay may result in damage to the drive.
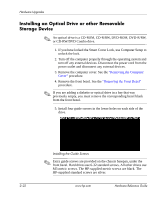
7. When installing an optical drive, the default audio solution is
digital audio. If analog audio is preferred, connect the audio cable
from the drive to the embedded audio connector on the system
board.
8. Connect the data and power cables on the back of the drives.