HP DL165 HP ProLiant DL165 Generation 5 Software Configuration Guide - Page 47
Launching the Red Hat Enterprise Linux 4 installer, Customizing the installation
 |
UPC - 884962026601
View all HP DL165 manuals
Add to My Manuals
Save this manual to your list of manuals |
Page 47 highlights
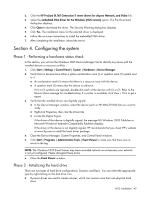
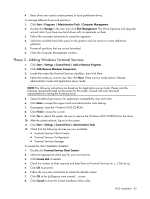
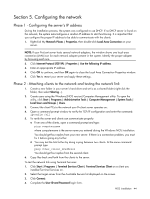
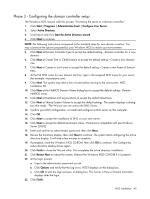
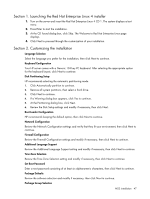
Section 1. Launching the Red Hat Enterprise Linux 4 installer 1. Turn on the server and insert the Red Hat Enterprise Linux 4 CD 1. The system displays a text menu. 2. Press Enter to start the installation. 3. At the CD Found dialog box, click Skip. The Welcome to Red Hat Enterprise Linux page displays. 4. Click Next to proceed through the customization of your installation. Section 2. Customizing the installation Language Selection Select the language you prefer for the installation, then click Next to continue. Keyboard Configuration Your HP server comes with a Generic 104-key PC keyboard. After selecting the appropriate option for the keyboard layout, click Next to continue. Disk Partitioning Setup HP recommends selecting the automatic partitioning mode. 1. Click Automatically partition to continue. 2. Remove all system partitions, then select a hard drive. 3. Click Next to continue. 4. If a Warning dialog box appears, click Yes to continue. 5. At the Partitioning dialog box, click Next. 6. Review the Disk Setup settings and modify if necessary, then click Next. Boot Loader Configuration HP recommends keeping the default option, then click Next to continue. Network Configuration Review the Network Configuration settings and verify that they fit your environment, then click Next to continue. Firewall Configuration Review the Firewall Configuration settings and modify if necessary, then click Next to continue. Additional Language Support Review the Additional Language Support setting and modify if necessary, then click Next to continue. Time Zone Selection Review the Time Zone Selection setting and modify if necessary, then click Next to continue. Set Root Password Enter a root password consisting of at least six alphanumeric characters, then click Next to continue. Package Defaults Review the software selection and modify if necessary, then click Next to continue. Package Group Selection NOS installation 47
-
 1
1 -
2
-
3
-
4
-
5
-
6
-
7
-
8
-
9
-
10
-
11
-
12
-
13
-
14
-
15
-
16
-
17
-
18
-
19
-
20
-
21
-
22
-
23
-
24
-
25
-
26
-
27
-
28
-
29
-
30
-
31
-
32
-
33
-
34
-
35
-
36
-
37
-
38
-
39
-
40
-
41
-
 42
42 -
 43
43 -
 44
44 -
 45
45 -
 46
46 -
 47
47 -
 48
48 -
 49
49 -
 50
50 -
 51
51 -
 52
52 -
53
-
54
-
55
-
56
-
57
-
58
-
59
-
60
-
61
-
62
 |
 |
