HP DL165 HP ProLiant DL165 Generation 5 Software Configuration Guide - Page 50
Installing Red Hat Enterprise Linux 5, Configuring the initial setup settings
 |
UPC - 884962026601
View all HP DL165 manuals
Add to My Manuals
Save this manual to your list of manuals |
Page 50 highlights
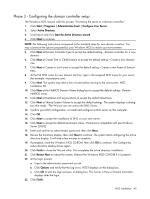
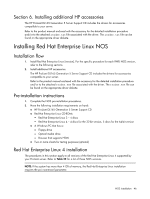
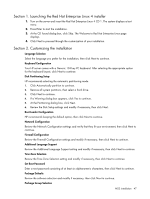
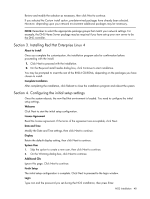
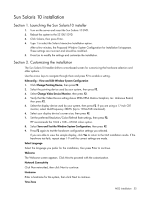
NOTE: Remember to select the appropriate package groups that match your network settings. For example, the DNS Name Server package may be required if you have set-up your new server to be the DNS controller. Section 3. Installing Red Hat Enterprise Linux 5 About to Install Once you complete the customization, the installation program asks for confirmation before proceeding with the install. 1. Click Next to proceed with the installation. 2. On the Required install media dialog box, click Continue to start installation. You may be prompted to insert the rest of the RHEL5 CD-ROMs, depending on the packages you have chosen to install. Complete Installation After completing the installation, click Reboot to close the installation program and reboot the system. Section 4. Configuring the initial setup settings Once the system reboots, the new Red Hat environment is loaded. You need to configure the initial setup settings. Welcome Click Forward to start the initial setup configuration. License Agreement Read the license agreement. If the terms of the agreement are acceptable, click Forward. Firewall Review the Firewall Configuration settings and modify if necessary, then click Forward to continue. Kdump Retain the default display setting, then click Forward to continue. Date and Time Modify the Date and Time settings, then click Next to continue. Set up Software Updates Ignore this page, then click Forward to continue. Create User 1. Skip the option to create a new user, then click Forward to continue. 2. On the Warning dialog box, click Continue. Additional CDs Ignore this page. Click Next to continue. Finish Setup The initial setup configuration is complete. Click Forward to proceed to the login window. Login NOS installation 50
-
 1
1 -
2
-
3
-
4
-
5
-
6
-
7
-
8
-
9
-
10
-
11
-
12
-
13
-
14
-
15
-
16
-
17
-
18
-
19
-
20
-
21
-
22
-
23
-
24
-
25
-
26
-
27
-
28
-
29
-
30
-
31
-
32
-
33
-
34
-
35
-
36
-
37
-
38
-
39
-
40
-
41
-
42
-
43
-
44
-
 45
45 -
 46
46 -
 47
47 -
 48
48 -
 49
49 -
 50
50 -
 51
51 -
 52
52 -
 53
53 -
 54
54 -
 55
55 -
56
-
57
-
58
-
59
-
60
-
61
-
62
 |
 |
