HP Designjet 130 Quick Reference Guide - Page 10
How Do I Load a Roll of Paper? - roll feed
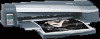 |
View all HP Designjet 130 manuals
Add to My Manuals
Save this manual to your list of manuals |
Page 10 highlights
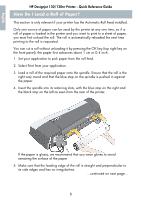
English HP Designjet 130/130nr Printer - Quick Reference Guide How Do I Load a Roll of Paper? This section is only relevant if your printer has the Automatic Roll Feed installed. Only one source of paper can be used by the printer at any one time, so if a roll of paper is loaded in the printer and you want to print to a sheet of paper, you must first unload the roll. The roll is automatically reloaded the next time printing to the roll is requested. You can cut a roll without unloading it by pressing the OK key (top right key on the front panel); the paper first advances about 1 cm or 0.4 inch. 1. Set your application to pick paper from the roll feed. 2. Select Print from your application. 3. Load a roll of the required paper onto the spindle. Ensure that the roll is the right way round and that the blue stop on the spindle is pushed in against the paper. 4. Insert the spindle into its retaining slots, with the blue stop on the right and the black stop on the left as seen from the rear of the printer. If the paper is glossy, we recommend that you wear gloves to avoid smearing the surface of the paper. 5. Make sure that the leading edge of the roll is straight and perpendicular to its side edges and has no irregularities. ...continued on next page... 8
-
 1
1 -
2
-
3
-
4
-
 5
5 -
 6
6 -
 7
7 -
 8
8 -
 9
9 -
 10
10 -
 11
11 -
 12
12 -
 13
13 -
 14
14 -
 15
15 -
16
-
17
-
18
-
19
-
20
-
21
-
22
-
23
-
24
-
25
-
26
-
27
-
28
-
29
-
30
-
31
-
32
-
33
-
34
-
35
-
36
-
37
-
38
-
39
-
40
-
41
-
42
-
43
-
44
-
45
-
46
-
47
-
48
-
49
-
50
-
51
-
52
-
53
-
54
-
55
-
56
-
57
-
58
-
59
-
60
-
61
-
62
-
63
-
64
-
65
-
66
-
67
-
68
-
69
-
70
-
71
-
72
-
73
-
74
-
75
-
76
-
77
-
78
-
79
-
80
-
81
-
82
-
83
-
84
-
85
-
86
-
87
-
88
-
89
-
90
-
91
-
92
-
93
-
94
-
95
-
96
-
97
-
98
-
99
-
100
-
101
-
102
-
103
-
104
-
105
-
106
-
107
-
108
-
109
-
110
-
111
-
112
-
113
-
114
-
115
-
116
-
117
-
118
-
119
-
120
-
121
-
122
-
123
-
124
-
125
-
126
-
127
-
128
-
129
-
130
-
131
-
132
-
133
-
134
-
135
-
136
-
137
-
138
-
139
-
140
-
141
-
142
-
143
-
144
-
145
-
146
-
147
-
148
-
149
-
150
-
151
-
152
-
153
-
154
-
155
-
156
-
157
-
158
-
159
-
160
-
161
-
162
-
163
-
164
-
165
-
166
-
167
-
168
-
169
-
170
-
171
-
172
-
173
-
174
-
175
-
176
-
177
-
178
-
179
-
180
-
181
-
182
-
183
-
184
-
185
-
186
-
187
-
188
-
189
-
190
-
191
-
192
-
193
-
194
-
195
-
196
-
197
-
198
-
199
-
200
-
201
-
202
-
203
-
204
-
205
-
206
-
207
-
208
-
209
-
210
-
211
-
212
-
213
-
214
-
215
-
216
-
217
-
218
-
219
-
220
-
221
-
222
-
223
-
224
-
225
-
226
-
227
-
228
-
229
-
230
-
231
-
232
-
233
-
234
-
235
-
236
-
237
-
238
-
239
-
240
-
241
-
242
-
243
-
244
-
245
-
246
-
247
-
248
-
249
-
250
-
251
-
252
-
253
-
254
-
255
 |
 |
