HP Designjet 130 Quick Reference Guide - Page 16
How do I Clean a Printhead?
 |
View all HP Designjet 130 manuals
Add to My Manuals
Save this manual to your list of manuals |
Page 16 highlights
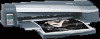
English HP Designjet 130/130nr Printer - Quick Reference Guide How do I Clean a Printhead? If a printhead fails or needs attention, the corresponding icon on the front panel will flash. Make sure the printhead is correctly seated. If this is not the problem, the most likely cause of failure is that the printhead contacts need to be cleaned. You will need the following cleaning materials: • Clean, soft, lint-free material that will not come apart or leave fibres when damp (a coffee filter, for example) • Distilled or filtered water • Paper towels Make sure the printer is powered on, then do the following: 1. Open the front hinged flap at the right of the printer. 2. Open the second (back) part of the flap and lift it back fully. The print carriage will move to the left and then back to the right. Wait for it to stop. When the carriage has stopped moving, unplug the power cable from the printer. 3. Pull the printhead cover up and towards you, so that the hook at the front unlatches itself, and then push the whole cover back so that the printheads are exposed. 4. Remove the failed printhead by lifting the small handle at the top front and using it to pull the printhead vertically up and out of the printer. ...continued on next page... 14
-
 1
1 -
2
-
3
-
4
-
5
-
6
-
7
-
8
-
9
-
10
-
 11
11 -
 12
12 -
 13
13 -
 14
14 -
 15
15 -
 16
16 -
 17
17 -
 18
18 -
 19
19 -
 20
20 -
 21
21 -
22
-
23
-
24
-
25
-
26
-
27
-
28
-
29
-
30
-
31
-
32
-
33
-
34
-
35
-
36
-
37
-
38
-
39
-
40
-
41
-
42
-
43
-
44
-
45
-
46
-
47
-
48
-
49
-
50
-
51
-
52
-
53
-
54
-
55
-
56
-
57
-
58
-
59
-
60
-
61
-
62
-
63
-
64
-
65
-
66
-
67
-
68
-
69
-
70
-
71
-
72
-
73
-
74
-
75
-
76
-
77
-
78
-
79
-
80
-
81
-
82
-
83
-
84
-
85
-
86
-
87
-
88
-
89
-
90
-
91
-
92
-
93
-
94
-
95
-
96
-
97
-
98
-
99
-
100
-
101
-
102
-
103
-
104
-
105
-
106
-
107
-
108
-
109
-
110
-
111
-
112
-
113
-
114
-
115
-
116
-
117
-
118
-
119
-
120
-
121
-
122
-
123
-
124
-
125
-
126
-
127
-
128
-
129
-
130
-
131
-
132
-
133
-
134
-
135
-
136
-
137
-
138
-
139
-
140
-
141
-
142
-
143
-
144
-
145
-
146
-
147
-
148
-
149
-
150
-
151
-
152
-
153
-
154
-
155
-
156
-
157
-
158
-
159
-
160
-
161
-
162
-
163
-
164
-
165
-
166
-
167
-
168
-
169
-
170
-
171
-
172
-
173
-
174
-
175
-
176
-
177
-
178
-
179
-
180
-
181
-
182
-
183
-
184
-
185
-
186
-
187
-
188
-
189
-
190
-
191
-
192
-
193
-
194
-
195
-
196
-
197
-
198
-
199
-
200
-
201
-
202
-
203
-
204
-
205
-
206
-
207
-
208
-
209
-
210
-
211
-
212
-
213
-
214
-
215
-
216
-
217
-
218
-
219
-
220
-
221
-
222
-
223
-
224
-
225
-
226
-
227
-
228
-
229
-
230
-
231
-
232
-
233
-
234
-
235
-
236
-
237
-
238
-
239
-
240
-
241
-
242
-
243
-
244
-
245
-
246
-
247
-
248
-
249
-
250
-
251
-
252
-
253
-
254
-
255
 |
 |