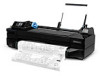
HP Designjet T120 HP Designjet T120 and T520 ePrinter Series - User's Guide - Page 87
Check printer status, Take care of the printer, Clean the exterior of the printer - supplies
 |
View all HP Designjet T120 manuals
Add to My Manuals
Save this manual to your list of manuals |
Page 87 highlights
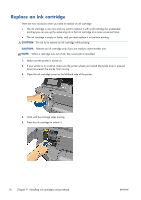
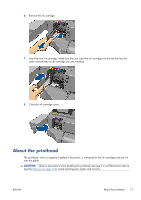
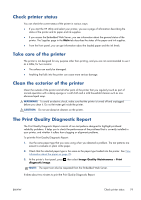
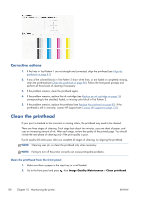
Check printer status You can check the current status of the printer in various ways: ● If you start the HP Utility and select your printer, you see a page of information describing the status of the printer and its paper and ink supplies. ● If you access the Embedded Web Server, you see information about the general status of the printer. The Supplies page in the Main tab describes the status of the paper and ink supplies. ● From the front panel, you can get information about the loaded paper and the ink levels. Take care of the printer The printer is not designed for any purpose other than printing, and you are not recommended to use it as a table, for two reasons: ● The surface can easily be damaged. ● Anything that falls into the printer can cause more serious damage. Clean the exterior of the printer Clean the outside of the printer and all other parts of the printer that you regularly touch as part of normal operation with a damp sponge or a soft cloth and a mild household cleaner such as nonabrasive liquid soap. WARNING! To avoid an electric shock, make sure that the printer is turned off and unplugged before you clean it. Do not let water get inside the printer. CAUTION: Do not use abrasive cleaners on the printer. The Print Quality Diagnostic Report The Print Quality Diagnostic Report consists of two test patterns designed to highlight printhead reliability problems. It helps you to check the performance of the printhead that is currently installed in your printer, and whether it suffers from clogging or alignment problems. To print the Print Quality Diagnostic Report: 1. Use the same paper type that you were using when you detected a problem. The test patterns are easiest to evaluate on plain white paper. 2. Check that the selected paper type is the same as the paper type loaded into the printer. See View information about the paper on page 39. 3. At the printer's front panel, press , then select Image Quality Maintenance > Print diagnostic image. NOTE: The report can also be requested from the Embedded Web Server. It takes about two minutes to print the Print Quality Diagnostic Report. ENWW Check printer status 79
-
 1
1 -
2
-
3
-
4
-
5
-
6
-
7
-
8
-
9
-
10
-
11
-
12
-
13
-
14
-
15
-
16
-
17
-
18
-
19
-
20
-
21
-
22
-
23
-
24
-
25
-
26
-
27
-
28
-
29
-
30
-
31
-
32
-
33
-
34
-
35
-
36
-
37
-
38
-
39
-
40
-
41
-
42
-
43
-
44
-
45
-
46
-
47
-
48
-
49
-
50
-
51
-
52
-
53
-
54
-
55
-
56
-
57
-
58
-
59
-
60
-
61
-
62
-
63
-
64
-
65
-
66
-
67
-
68
-
69
-
70
-
71
-
72
-
73
-
74
-
75
-
76
-
77
-
78
-
79
-
80
-
81
-
 82
82 -
 83
83 -
 84
84 -
 85
85 -
 86
86 -
 87
87 -
 88
88 -
 89
89 -
 90
90 -
 91
91 -
 92
92 -
93
-
94
-
95
-
96
-
97
-
98
-
99
-
100
-
101
-
102
-
103
-
104
-
105
-
106
-
107
-
108
-
109
-
110
-
111
-
112
-
113
-
114
-
115
-
116
-
117
-
118
-
119
-
120
-
121
-
122
-
123
-
124
-
125
-
126
-
127
-
128
-
129
-
130
-
131
-
132
-
133
-
134
-
135
-
136
-
137
-
138
-
139
-
140
-
141
-
142
-
143
-
144
-
145
-
146
-
147
-
148
-
149
-
150
-
151
-
152
-
153
-
154
-
155
-
156
 |
 |
