HP DeskJet Ink Advantage Ultra 4800 User Guide - Page 96
Control panel error codes and status, Control panel error codes
 |
View all HP DeskJet Ink Advantage Ultra 4800 manuals
Add to My Manuals
Save this manual to your list of manuals |
Page 96 highlights
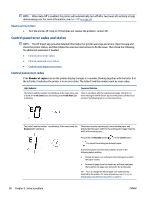
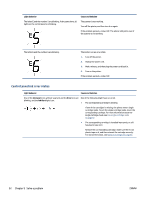
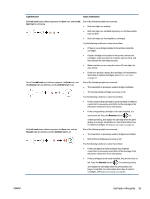
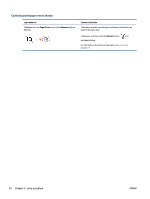
NOTE: When Auto-Off is enabled, the printer will automatically turn off after two hours of inactivity to help reduce energy use. For more information, see Auto-Off on page 39. Resolve printer failure ● Turn the printer off, then on. If that does not resolve the problem, contact HP. Control panel error codes and status NOTE: The HP Smart app provides detailed information for printer warnings and errors. Open the app and check the printer status, and then follow the onscreen instructions to fix the issue. Then check the following for additional assistance if needed. ● Control panel error codes ● Control panel ink error status ● Control panel paper error status Control panel error codes If the Number of copies icon on the printer display changes to a number, blinking together with the letter E at the left side, it indicates the printer is in an error state. The letter E and the number work as error codes. Light behavior Cause and Solution The letter E and the number 0 are blinking. At the same time, one or both of the Ink Level icons are blinking and the Ink Alert light is blinking. There is a problem with the indicated cartridges. Check for an error message in the HP Smart app or in the printer software and resolve it by following the on-screen instructions. The letter E and the number 1 are blinking. At the same time, the Resume light is blinking. The printer receives a printing job, starts feeding paper, and detects that the paper width for the printing job is bigger than the width of the loaded paper. Press either the Resume button ( ) or the Cancel button ( ) to cancel the printing job and eject paper. To avoid the paper size mismatch problem, do one of the following before printing. ● Change the paper size setting for the printing job to match the paper loaded. ● Remove all paper from the input tray, and then load paper that matches the paper size setting for the printing job. TIP: You can change the default paper size automatically detected by the printer. For more information, see Change the default paper size detected by printer on page 16. 90 Chapter 9 Solve a problem ENWW
-
 1
1 -
2
-
3
-
4
-
5
-
6
-
7
-
8
-
9
-
10
-
11
-
12
-
13
-
14
-
15
-
16
-
17
-
18
-
19
-
20
-
21
-
22
-
23
-
24
-
25
-
26
-
27
-
28
-
29
-
30
-
31
-
32
-
33
-
34
-
35
-
36
-
37
-
38
-
39
-
40
-
41
-
42
-
43
-
44
-
45
-
46
-
47
-
48
-
49
-
50
-
51
-
52
-
53
-
54
-
55
-
56
-
57
-
58
-
59
-
60
-
61
-
62
-
63
-
64
-
65
-
66
-
67
-
68
-
69
-
70
-
71
-
72
-
73
-
74
-
75
-
76
-
77
-
78
-
79
-
80
-
81
-
82
-
83
-
84
-
85
-
86
-
87
-
88
-
89
-
90
-
 91
91 -
 92
92 -
 93
93 -
 94
94 -
 95
95 -
 96
96 -
 97
97 -
 98
98 -
 99
99 -
 100
100 -
 101
101 -
102
-
103
-
104
-
105
-
106
-
107
-
108
-
109
-
110
-
111
-
112
-
113
-
114
-
115
-
116
-
117
-
118
-
119
-
120
-
121
-
122
-
123
-
124
 |
 |
