HP DeskJet Ultra Ink Advantage 2029 User Guide - Page 27
Solve a problem, Improve print quality
 |
View all HP DeskJet Ultra Ink Advantage 2029 manuals
Add to My Manuals
Save this manual to your list of manuals |
Page 27 highlights
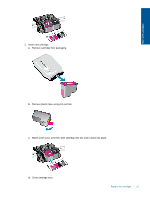
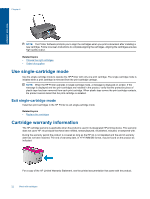
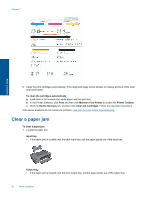
7 Solve a problem This section contains the following topics: • Improve print quality • Clear a paper jam • Unable to print • HP support Improve print quality 1. Make sure you are using genuine HP cartridges. 2. Check the print properties to make sure you have selected the appropriate paper type and print quality from the Media drop-down list. In the Printer Software, click Print and then click Set Preferences to access the print properties. 3. Check the estimated ink levels to determine if the cartridges are low on ink. For more information, see Check the estimated ink levels. If the print cartridges are low on ink, consider replacing them. 4. Align the printer cartridges. NOTE: Aligning the cartridges ensures high-quality output. The Printer Software prompts you to align the cartridges every time you install a new cartridge. If you remove and reinstall the same print cartridge, the Printer Software will not prompt you to align the print cartridges. The HP Printer remembers the alignment values for that print cartridge, so you do not need to realign the print cartridges. To align the cartridges from the Printer Software a. Load letter or A4 unused plain white paper into the input tray. b. In the Printer Software, click Print and then click Maintain Your Printer to access the Printer Toolbox. c. The Printer Toolbox appears. d. Click the Device Services tab, and then click Align Ink Cartridges. The product prints an alignment sheet. 5. Print a diagnostics page if the cartridges are not low on ink. To print a diagnostics page a. Load letter or A4 unused plain white paper into the input tray. b. In the Printer Software, click Print and then click Maintain Your Printer to access the Printer Toolbox. c. Click the Device Reports tab, and then click Print Diagnostic Information to print a diagnostics page. Review the blue, magenta, yellow, and black boxes on the diagnostics page. If you are seeing streaks in the color and black boxes, or no ink in portions of the boxes, then automatically clean the cartridges. Solve a problem Solve a problem 25
-
 1
1 -
2
-
3
-
4
-
5
-
6
-
7
-
8
-
9
-
10
-
11
-
12
-
13
-
14
-
15
-
16
-
17
-
18
-
19
-
20
-
21
-
 22
22 -
 23
23 -
 24
24 -
 25
25 -
 26
26 -
 27
27 -
 28
28 -
 29
29 -
 30
30 -
 31
31 -
 32
32 -
33
-
34
-
35
-
36
-
37
-
38
-
39
-
40
-
41
-
42
-
43
-
44
 |
 |